
Installation Guide

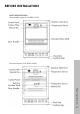
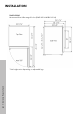
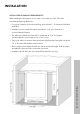

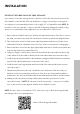
Table Of Contents

14
INSTALLATION
CARBON FILTER
A built-in carbon filter protects your beverages by acting as a natural barrier against
harmful odors. The filter should be replaced every 3-6 months. To replace the filter, search
for BWC-003 on www.zlineparts.com, ZLINE’s official parts distribution partner.
To replace the filter, first remove racks/shelves from the top of the unit to access the filter.
Then, using a pair of needle-nose pliers, stick the ends into the slots on each side of the filter,
turn either clockwise or counter-clockwise until the slots are at the top and bottom, and then
pull out the filter from the rear panel. Put the new filter in and reverse the order.
INSTALLING THE HANDLE*
1. Pull back slightly on the door gasket (see image below) to access both screw holes.
2. Place a split lock washer on each screw and insert both into the holes.
3. Facing the front of the door, place the flat washers on both screws and then tighten the
mounting studs on each screw until snug.
4. Assemble the handle onto both mounting studs, making sure to note stud direction.
5. Tighten each screw part way using the provided Allen/hex wrench. Once both screws
are started, tighten each to be snug. Do not over tighten.
Scan to follow along with a video.
Installing the Handle
*Each wine cooler / beverage cooler comes with a handle hardware kit containing two door screws, two
mounting studs, two split lock washers, and two flat washers.