
Installation Guide

8. Initialization of Lock
7
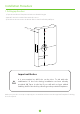
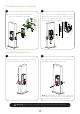
After installing the Lock, you must perform Initialization process, as explained in the steps below:
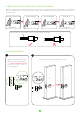
1) Rotate the Knob to make the Latch Bolt in the position. extended
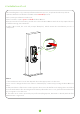
2) First, insert just 3 batteries in the Lock.
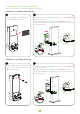
3) Use a needle or a pin to and the Reset Button. press hold
4) Now, insert the last one battery, and do not release the Reset Button until the Lock prompts “Restore
to default settings, wait a moment.”
5) After 10 seconds, the Lock will prompt “Complete”, which means the Initialization process is
completed.
Notice:
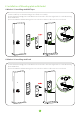
1. This initialization will clear all the data and detect the appropriate lock direction.
2. You can also change the direction of the Lock manually by continuously pressing the Reset Button 5
times.
3. If the Installation of the latch is in the opposite direction to the default Lock setting, there would be a
noise from the Motor after inserting the final battery. When this state occurs, perform the Initialization
process again to solve the issue.
4. The initial Lock can be opened by any verification(Fingerprints, Passwords or Cards) until the first
Administrator is registered.