OWNER’S & OPERATING MANUAL Please read this manual before operating your scooter “Simplicity in Mobility” zip’r3 zip’r4 zip’r xtra PDF created with pdfFactory trial version www.pdffactory.
Zip’r™ Mobility (800) 760-9107 TABLE OF CONTENTS SAFETY INFORMATION……………………………………………… Pg. 3 EMI/RFI WARNING..…………………………………………………… Pg. 4 YOUR ZIP’R………………………………………………………………. Pg. 5 ASSEMBLY & DISASSEMBLY……………………………………... Pg. 6-7 BATTERY CHARGING………………………………………………... Pg. 8 OPERATING YOUR ZIP’R…………………………………………... Pg. 9 SPECIFICATIONS …………………………………………………….. Pg. 10 CARE & MAINTENANCE………………………………………….…. Pg. 11 TROUBLESHOOTING……………………………………………….… Pg. 12 WARRANTY…………………………………………………………….… Pg.
SAFETY INFORMATION Please read and understand these warnings and the entire manual before using your Zip’r Mobility Scooter. IMPORTANT – This vehicle is not intended for use as a medical device. Important DOs • Always turn the key switch OFF before getting on/off your scooter. • Always turn the power off when the unit is not in use. • Always Unlock tiller lock (located at the bottom of the tiller) prior to operating scooter. • Always make sure your seat is locked before driving your scooter.
EMI/RFI WARNING RADIO WAVE SOURCES MAY AFFECT POWERED MOBILE VEHICLE CONTROL. Electromagnetic (EMI) or Radio Frequency Interference (RFI) refers to the effects that outside sources of such energy might have on the control systems of your mobility vehicle. The interference from these sources could cause the vehicle to release its brakes, move by itself, and/or cause damage to the mobility vehicle controller.
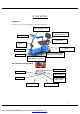
YOUR ZIP’R3 Components The Zip’r3 consists of the following major components shown below.
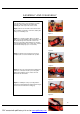
ASSEMBLY AND DISASSEBLY The following are the steps required to assemble your Zip’r. Disassembly can be achieved by following all of the steps in the reverse order. Figure 1. There are five main sections that need to be assembled: Front frame, rear frame, battery box, seat post, and folding seat. Figure 1. Figure 2. To begin assembly, tilt the rear frame back so it is freely standing on the rear bumper.
…assembly/disassembly continued, Figure 6. Loosen tiller adjustment knob, raise the tiller to the desired angle, and then retighten the tiller adjustment knob. Unlock tiller lock located at the bottom front of the scooter tiller by pushing and turning knob. (WARNING scooter will not turn if lock is not released. The tiller lock should only be locked during transportation of scooter) Figure 6. Figure 7. Carefully place the battery box into battery compartment.
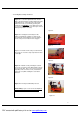
BATTERY CHARGING Figure 11. Figure 12. A Battery Charger similar to that shown in Figure 11. above is supplied with your Zip’r. Your Zip’r is equipped with two sealed, maintenance free 12 AH batteries. The battery condition can be monitored on the battery indicator meter located on the tiller console, see Figure 12., Green color indicates fully charged battery and red color indicates that an immediate recharge is necessary.
OPERATING YOUR ZIP’R Check The Following Before Operating Your Scooter • • • • • • • • • Verify that the freewheel brake lever is in the rear (drive) position. Verify that the front till lock is UNLOCKED Verify that the seat is in the correct position and is securely locked. Verify that the steering tiller is tightened securely. Sit down on your scooter. Insert the key only after you have completed the above steps. Verify that the horn and head light work properly.
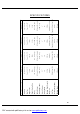
PDF created with pdfFactory trial version www.pdffactory.com 10 miles 4.25 mph Per-Charge Range (Max) Maximum Speed Foldable foam filled Red/Blue Body Colors Seat Type 250 lbs 30" Turning Radius Maximum Weight Capacity 2.1" 155 W, .21 hp Off board, 2A current Ground Clearance Power Rating of Motor Battery Charger 12 V, 12 AH, 2pcs 29 lbs Weight - Heaviest Piece Battery 102 lbs 2 pcs 2.5" x 7.5" Rear Tires Weight - Total 1 pcs 2.0" x 7.5" Zip'r3 36.4" x 19.
CARE AND MAINTENANCE Your Zip’r3 requires a minimal amount of maintenance. The following are the maintenance items that should be followed to ensure that your scooter is safe and reliable. Daily • • Charge your battery daily if your scooter is used for more than twenty minutes. Always store your scooter in a warm and dry environment. Cleaning • • • The scooter shroud is made from durable ABS plastic with a high gloss type finish.
TROUBLESHOOTING As with any electromechanical device, electric scooters may occasionally require troubleshooting. Many of such issues can be resolved by referring to the options below. If the vehicle will not move, please check to ensure the following: • • • • The battery box is inserted fully and correctly. The brake release lever (free wheel lever) is in the drive position (rear position). The battery is charged. The key is in the ignition and turned on.
WARRANTY If you purchased a warranty from a dealer then contact your dealer directly for details and warranty service. If you purchased a Zip’r Mobility manufacturer’s warranty with your product then the warranty below applies to your scooter. If you did not purchase a warranty with your product and you need service please contact Zipr Mobility or an authorized dealer for assistance. THREE-YEAR LIMITED WARRANTY Three years on all structural frame components; including platform, fork, seat post, and frame.