
Operating instructions


TECHNIC
ZIPPER MASCHINEN GmbH www.zipper-maschinen.at Seite 40
RASENMÄHER-ROBOTER / ROBOT LAWN MOWER ZI-RMR 2600e 40
11.3 Functions
Lift sensor
There are lift sensors located between the top
and middle cover. If the mower is lifted from
ground, it will stops working within 1 second
Emergency stop switch
There is an emergency switch located on the top
of mower and red in colour. When pressed, the
mower will shut down immediately. Rotate the
switch clockwise to release it.
Tilt sensor
There are tilt sensors installed on the mower
too, when the mower is tilted over 30 degrees
in any direction, it stops working within 2
seconds.
Pressure sensors
The pressure sensors located on the top cover.
If a child or some thing rides or sits on the
mower, it stops working within 1 second.
Bump sensors
The whole top cover is movable. Both front and
the two sides of mower equipped with bump
sensors that will activate when the mower
strikes solid, fixed object when that object is at
least 6cm in vertical height from the supporting
surface of the mower. When the bump sensor
activated, the mower will stop movement in
that direction and reverse itself away from the
obstacle.
Two cutting modes
There are two cutting modes of the mower, go
straight and go circle (high efficiency).
In Auto, mower selects cutting mode
intelligently. It goes straight if the grass is
sparse or it has be cut off, and it goes circle if
the grass is dense or long.
In manual mode, the mower will just go were
you direct it.
Rain sensors
There are two rain sensors located on the
control panel at top cover of mower. The
mower will go back to the charging station
automatically when it's raining.
Rain sensors can be selected ON/OFF from
control panel.
Turn on: the mower will go back home if it is
raining.
Turn off: the mower will go on mowing when it
is raining.
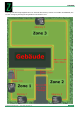
Virtual wire
The robot lawn mower can't be operated without
a virtual wire. (we suggest to use 100m-600m
of virtual wire). The mower will follow virtual
wire to charging station, the virtual wire acts as
a virtual fence. It will get on the virtual wire
until it meets charging sheets, then it gets off
from virtual wire and starts cutting inside. LINE
(virtual wire) can be selected ON/OFF from
control panel.
Touch sensor
Touch the handle when the mower is cutting, it
will cease function within 0.5 second.
Mower stops working if virtual wire is cut
off or charging station is power off
If virtual wire is cut or broken, or the charging
station loose power, the mower will stop working
within 3 seconds.
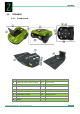
Wireless remote controller
LCD display
Mowing schedule
Set up one week (From Monday to Sunday,
once for each day) cutting schedule from
control panel. This function should be used
together with AREA function.
Four steps to safely start the mower
There are four necessary steps to start the
mower:
1. Connect charging station with power supply
by charger and make sure the recharging light is
in green color.
2. Connect virtual wire to charging station and
make sure it is in good connecting(virtual wire
light in colorless).
3. Turn on the power button and release the
emergency switch.
4. Input password if selected and select mode.