
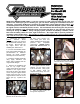
Owner's manual

Your AutoTune module is
designed to communicate with
the ThunderMax through the
bike’s Data Link connector. This
port is also where the AutoTune
draws its power. However, on
1997-2001 model Big Twins, the
12 volt terminal (#4 in the Data
Link plug) is “hot” at all times,
not upon “key-on” as are 2002
and later (Delphi) bikes. The
Data Link must be rewired to
provide power for the AutoTune
module only when in the “key-
on” position or battery drain will
result.
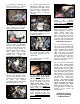
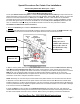
To rewire this plug: Identify the
“Accessory” plug, located under
the seat nose, just below and to
the right of the frame’s backbone
where it intersects with the frame
side rails. This plug has 4 wires
routed to it. Locate the blue wire
in the #1 position.
Remove the rubber seal plug
(or, if there are any accessories
plugged into the accessory port,
temporarily unplug the
accessory). Remove the socket
lock and push the #1 terminal
and wire out of the plug. Clip off
the terminal end and install a
new (supplied) terminal on the
blue wire along with the supplied
length of orange wire (crimp
together). Reinstall the terminal
into the #1 port of the accessory
plug and reassemble the plug.
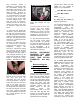
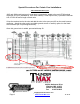
Remove the lock from the Data
Link plug and push the
red/orange wire and terminal
from the #4 position. Route the
orange wire from the accessory
plug to the Data Link plug.
Crimp the supplied terminal to
the orange wire and install it into
the Data Link #4 plug. Cover the
end of the original red/orange
“hot” wire terminal end, and tuck
the covered terminal into the
harness sleeve.
Your Data Link plug will now be
wired “hot” through the key
switch.
You may choose to source your
“key-hot” wire from another
location; certainly your choice.
Whatever you choose, the wire
in the #4 Data Link plug must be
changed to a “key-hot” wire or a
dead battery will be the result.
21. Plug the closed loop module
into the power source (Data
Link) on the bike. It is through
the data port that data from the
AutoTune module is transferred
to the ThunderMax. A ‘Y’
harness is available to keep an
open data port if desired.
SPECIAL PROCEDURE
REQUIRED FOR ECM
INITIALIZATION UPON
FIRST TIME KEY-ON
POWER-UP! See Step
24.
Before starting the
engine for the first time,
Thoroughly check
motorcycle for:
Fuel leaks at all line connections
including the pressure regulator
block, fuel rail fittings and all
hose connections; tight battery
and ground connections; proper
throttle cable adjustment (throttle
closes and opens fully with
proper free-play), smooth throttle
operation (ensure that the
throttle returns to the idle
position quickly and
automatically), and a full fuel
tank with fresh high-test fuel.
Perform the next steps after all
systems have been verified as
operational from re-assembly.
Confirm that a base map was
loaded into your module by
Zipper’s for your application:
____ Base Map NOT Loaded
____ Base Map Loaded
Map # _________
If a base map was loaded by
Zipper’s, skip step 23.
22. Insert the SmartLink CD into
your computer. SmartLink will
automatically open the
InstallShield Wizard when the
computer finds the CD-Rom.
Follow the instructions and
install the software on your
computer. After installation,
attach the serial cable to your
computer and the ThunderMax
ECM. (If you do not have a
serial port on your computer for
the communication cable, you
will need to use a USB to Serial
converter; an inexpensive
converter is available from
Zipper’s, #372-000. Install the
drivers at this time; follow the
instructions given by the
manufacturer of the converter.)
Make certain that the cable is
routed away from any part of the
motorcycle that generates heat.
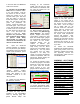
23. If a base map was NOT
loaded, select and load a base
map that best matches your
engine combination and
exhaust. Install the SmartLink
software to your hard drive, open
the software and consult the
SmartLink Tuning Manual by
clicking on the [Help] menu on
the toolbar, then [SmartLink
Tuning Manual]. Proceed to
section 3 and follow the
instructions for choosing and
loading a base map. After the
base map is loaded, while
linked, go to the Tuning Tree,
select [Module Configuration]
[Basic Settings] and click on
[Speedo Cal] and set this to
4352. Close the [Basic Settings]
window and click [Configure] on
the toolbar, then click [Closed
Loop MODULE Settings] and
verify that the “Closed Loop
Processing” boxes are checked