
Installation Guide

801314 - Zip HydroTap BC, BCHA, AIO, Installation Instructions - Aug 2015 - V2.01 Page 27 of 40
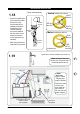
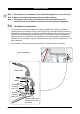
Note 1: This appliance is intended for use with the Zip HydroTap under sink unit.
Note 2: Water connections must be pointing vertically upwards.
Note 3: The booster unit should be installed as close as possible to the Zip
HydroTap Unit as the 400mm connection hoses cannot be lengthened.
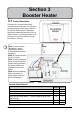
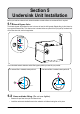
Booster System
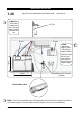
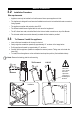
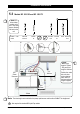
3.4 Braided hose connection
s
1.
The cold water inlet (blue) and hot water outlet (red) are marked on the rating plate. Connect the
braided hoses from the ‘Bypass Out’ fitting on the Zip HydroTap, to the water inlet of the booster unit
(Marked Blue) and from the outlet of the booster unit (Marked Red) to the ‘Bypass IN’ fitting on the Zip
HydroTap unit. Avoid exerting any mechanical pressure on the appliance. This can be achieved by
applying a spanner on the flats of the inlet and outlet connections when tightening the braided hose
connectors. Do not over tighten ! Tighten the braided hoses by hand, then turn an additional 90° - 180°
with a spanner
2.
Once the water connections have been made, check for any leaks and rectify as necessary.
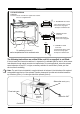
Hot Water
Connection
(outlet, G1/2”)
Strainer
Cold Water
Connection
(inlet, G1/2”)
Hold the hexagon while
tightening the braided
hose fittings
Braided Hoses
Typical Installation