
Installation Guide

Page 24 of 40 801314 - Zip HydroTap BC, BCHA, AIO, Installation Instructions - Aug 2015 - V2.01
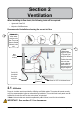
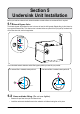
Ventilation
= =
max 43
314.00
12.00
12.00
285.00
12.00
5
326.00
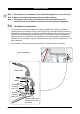
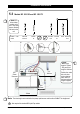
CUT OUT DETAILS
A
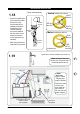
A - KICKBOARD CUT-OUT
1.Drill 4 pilot holes Ø12 in corners
2.Finish cut-out using Jigsaw
and Keyhole or Wall Board saw
B - CABINET FLOOR
CUT-OUT
1.Drill two pilot holes Ø12
2.Finish cut-out using Jigsaw
C - CABINET FLOOR
CUT-OUT
1.Drill 4 pilot holes
Ø12 in corners
2.Finish cut-out using Jigsaw
and Keyhole or Wall Board saw
ATTENTION:
Insure that: Cut outs 'A' and 'B' are on opposite side of cabinet.
Cut out 'C' is straight behind'A'
60.00
B
C
12.00
45.00
284
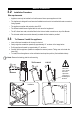
The following instructions are critical if the vent kit, as supplied, is not fitted:
If the kick board vent kit cannot be used then it is important to fit a standard HydroTap vent kit, which ensures
heat dissipation through natural convection via installed vents. For normal applications, where the cupboard
space temperature is near 35°C, or higher, an auxiliary ventilation kit must be fitted. (Contact your local
service centre for availability).
Note: The vent kit has to be installed in a way that allows air to be drawn in from the bottom of the cupboard
and expelled through the top of the cupboard. Therefore placement of the outlet vent should be towards the
top of the door (Option 1) or on the upper side of the cupboard (Option 2).
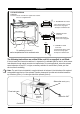
Min 450mm
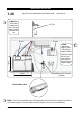
For positioning of cut out C
use the template marked on the cardboard carton
Side outlet vent (Option 2)
Door outlet
louvre
(Option 1)
Front inlet vent
Cool Air IN
Warm Air OUT