
User Manual


09
806143 - CW ChillTap UCCT 10.18 v1.03
Installation instructions
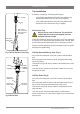
Hose Connections
Note: To avoid water leaks, be careful not to damage the tubes.
The tube must not be kinked around a bend, as the tube may
contain water under pressure. If shortening the hoses, ensure
ends are cut clean and square.
1. Remove plugs from the outlet fittings on the top of
the undersink chiller unit by depressing the collet and
simultaneously pulling out the plug.
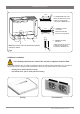
2. Measure and trim the three 1/4” coloured hoses from the carafe
tap to the outlet fittings on the top of the chiller unit. See Fig.6
and Fig.7.
3. Before making the connections, insulate the hoses with the
loose length of foam insulation. Trim the insulation to about
5-10mm shorter than the tube.
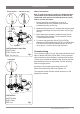
4. For correct hose connection, refer to Fig.6 for ChillTap
Standard and ChillTap Heavy Duty, and Fig.7 for ChillTap Extra.
Push each hose into the quick-release connector as far as it
will go (approx. 15 mm) to ensure a tight connection.
ChillTap Extra
BLUE
WHITE RED
ChillTap Extra
WHITE: Ambient
BLUE: Chilled
RED: Vent
Fig.7
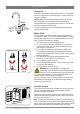
ChillTap Standard / Heavy Duty
WHITE: Chilled
BLUE: Tee piece, side
RED: Tee piece, top
BLUE
WHITE
RED
Tee piece
ChillTap Standard ChillTap Heavy Duty
Fig.6
Commissioning
Turn on the water supply to the unit, then rotate and hold the chilled
water or ambient water lever (ChillTap Extra). First air, then water
will flow from the tap. Allow the water to continue to flow for about
10 litres, which is required to activate the filter. Once this has been
done release the lever to turn off the water. The lever will spring
back to the upright position.
Connect the unit to the mains power supply and turn ON.
Switch ON the switch at the side of the undersink unit.
The compressor and fan will start, and will continue to run until
temperature is reached.