
User Manual


05
806143 - CW ChillTap UCCT 10.18 v1.03
Tap Installation
In addition to common tools, the following will be required:
• 25mm (ChillTap Standard/Heavy Duty) OR 35mm (ChillTap Extra)
diameter sheet metal hole punch for sink tops (not supplied)
• 25mm (ChillTap Standard/Heavy Duty) OR 35mm (ChillTap Extra)
diameter hole saw for timber bench tops (not supplied)
Position the Tap
Warning: Do not reuse old hose-sets. The unit shall be
installed with the new hose-sets supplied. Hoses are
maximum 1000 mm in length.
Position and install the tap at the back of the sink or on the Font, where there
is a minimum 52 mm wide flat area within the draining area of the sink. Make
sure the selected position allows the tap spout to overhang the sink bowl.
Ensure the distance between the tap and the undersink unit does not exceed
the length of the supplied tubing.
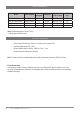
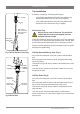
ChillTap Standard/Heavy Duty (Fig.1)
Use a 25mm sheet metal punch or hole saw to create a neat hole without
burrs.
Remove the large nut from the base of the tap, leaving the rubber sealing
ring (O-ring) in place.
Fit the tap and O-ring to the sink top, oriented so the operating lever is easily
accessible.
From under the sink, slide the nut over the tubes. Tighten the nut to secure
the tap firmly into place.
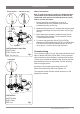
ChillTap Extra (Fig.2)
Use a 35mm sheet metal punch or hole saw to create a neat hole without
burrs.
Remove the large nut with the stainless steel and rubber washers from the
base of the tap, leaving the rubber sealing ring (O-ring) in place.
Fit the tap and O-ring to the sink top, oriented so the operating levers are
easily accessible.
From under the sink, slide first the rubber washer, and then the brass
washer, followed by the nut, over the tubes. Tighten the nut to secure the tap
firmly into place.
O-RING
LOWER
RUBBER
WASHER
WASHER
NUT
Blue tube to
Chilled Outlet
Red tube to
Vent Outlet
White tube to
Ambient Outlet
O-RING
White tube to
Chilled Outlet
Blue and Red
tubes to Tee piece
which connects to
Vent Outlet.
Fig.2 ChillTap Extra
Fig.1 ChillTap Standard / Heavy Duty
NUT
Installation instructions