Electronically controlled instantaneous water heater MCX: 27300, 27400 and 27600 models Installation instructions These appliances deliver water not exceeding 50 ºC in accordance with AS3498.
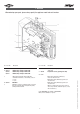
1. Overview When ordering spare parts, please always specify the appliance model and serial number. 4 5 6 1 2 7 3 Pos. Part.-No. Description Pos. Part.-No. Description 1 2 Hood with control panel MCX heating cartridge 3.5 kW / 230V MCX heating cartridge 4.4 kW / 230V MCX heating cartridge 5.
Contents 1. Overview . . . . . . . . . . . . . . . . . . . . . . . . . . . . . . . . . . . . . . . . . . . . . . . . . . . . . . . . . . . . . . . . . . . . . . . . . . . . . . . . . . . . . . . . . . . . . . . 2 2. Environment and recycling . . . . . . . . . . . . . . . . . . . . . . . . . . . . . . . . . . . . . . . . . . . . . . . . . . . . . . . . . . . . . . . . . . . . . . . . . . . . . . . . . . 3 3. Safety instructions . . . . . . . . . . . . . . . . . . . . . . . . . . . . . . . . . . . . . . . . .
3. Safety instructions Installation, initial operation and maintenance of this appliance must only be conducted by an authorised professional, who will then be responsible for adherence to applicable standards and installation regulations. We assume no liability for any damages caused by failure to observe these instructions. • Do not use the appliance until it has been correctly installed and unless it is in perfect working order.
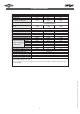
4. Technical specifications Type Part no. Capacity (Liter) MCX 3 27300 0,2 Nominal pressure MPa (bar) 1 (10) MCX 6 27600 0,2 1 (10) 1 (10) IES system bare resistance element Heating system Required water resistance at 15 °C in cm Electric supply Nominal power rating Nominal current Temperature choice Factory temperature setting Maximum inlet temperature Factory flow setting at 0.3MPa (3 bar) 2,0 l/min Maximum temperature 2,5 l/min increase at rated power 3,0 l/min and a flow rate of......
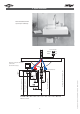
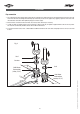
5. Typical installations Vented installation with special open outlet tap Flow controller MCX 3/4 : CSP 3 MCX 6 : CSP 6 Electrical connection with mains power cable (shorten if necessary) 6 Instructions for installer - 9120-15004 - MCX - 801053 - March 2013 v1.01 Dimensions in mm Top edge of wash basin approx.. 850 Angle valve approx. 550 Axis wall bracket approx. 520 Cable entry approx.
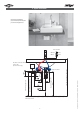
5. Typical installations Unvented installation (closed outlet) with tap for pressurised appliances Flow controller MCX 3/4 : CSP 3 MCX 6 : CSP 6 Dimensions in mm 7 Instructions for installer - 9120-15004 - MCX - 801053 - March 2013 v1.01 Angle valve approx. 550 Axis wall bracket approx. 520 Cable entry approx. 553 Angle valve G 1/2“ Top edge of wash basin approx..
6. Description of applicance The Zip instantaneous water heaters are compact electronically controlled water heaters. It is intended to provide economical heating of water for a wash basin when installed together with a sanitary water fitting. When the hot-water tap is opened, the heater switches itself on automatically when the minimum water flow rate is exceeded and heats the water as it passes through the appliance. There are 3 available temperature settings, 35ºC, 38ºC and 45ºC (Max).
7. Installation Installation site • Appliance must only be installed in frost-free rooms. Never expose appliance to frost. • The Appliance is designed for wall mounted installation and has to be installed with water connectors upwards. • The appliance complies with protection class IP 25. • In order to avoid thermal losses, the distance between the instantaneous water heater and the tapping point should be as small as possible (< 0.5m).
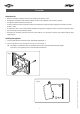
7. Installation Pipe connection 1. The cold water inlet (blue) and hot water outlet (red) are marked on the rating plate. Connect the appropriate pipes from the tap to the water inlet and outlet accordingly. Avoid exerting any mechanical pressure on the appliance by applying a spanner on the flats of the inlet and outlet connections when tightening the pipe connectors (Fig.3). 2. Once the water connections have been made, check for any leaks and rectify as necessary. 3.
7. Installation Electrical connection Do not switch on the electric power at this time. WARNING! To prevent damage to the appliance, the instantaneous water heater must be purged of air before using it for the first time. Purging Before connecting the electrical supply, open and close the hot water tap until the water runs smoothly and no more air emerges. NOTE! Every time the appliance is drained (e.g.
8. Commissioning Commissioning 1. Close the circuit breaker to connect the electrical supply. 2. Check everything is working as it should and the water temperature is achieving the desired temperature. If not follow the guide below to correct the temperature. 9. Flow rate adjustment Adjustment of the flow rate is to be done by a Qualified Technician. Adjustments are done by turning the adjusting screw located under the appliance’s cover.
9. Flow rate adjustment Adjustment of the flow rate is to be done by a Qualified Technician. Decreasing the flow rate: Turning the adjusting screw clockwise decreases the flow rate, thus making a higher outlet temperature possible. Increasing the flow rate: Turning the adjusting screw counter-clockwise increases the flow rate, thus reducing the possible outlet temperature. Direction Flow Temperature increase (+) / decrease (-) – + + – 10.
11. Maintenance • The appliance and fittings should only be cleaned with a damp cloth. Do not use abrasive or chlorine-based cleaning agents or solvents. • Keep the control panel area dry. • Clean the jet regulator regularly and replace as necessary. • Dirt and scale deposited in the pipes and appliance will affect its function. Typical indications of this are a reduced flow rate or noisy flow.
Instructions for installer - 9120-15004 - MCX - 801053 - March 2013 v1.01 13.
Zip Heaters (Aust) Pty. Ltd. ABN: 46 000 578 727 67 Allingham Street Condell Park NSW 2200 Postal: Locked Bag 80 Bankstown 1885 Australia Website: www.zipheaters.com Facsimile: (02) 9796 3858 Telephone: (02) 9796 3100 Free Call: 1 800 638 633 As Zip policy is one of continuous product improvement, changes to specifications may be made without prior notice. Images in this booklet have been modified and may not be true representations of the finished goods. 12.