
Operating instructions

Page 5 of 10 Zip Chill Tap - Installation & Operating Instructions - 82127 - June 2012 v1.03
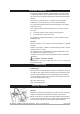
Use a 25 mm sheet metal punch to create a neat hole without burrs.
Remove the nut and washer from the base of the carafe filler, leaving the
rubber-sealing ring in place.
Fit the carafe filler and seal to the sink, oriented so that the operating lever is away
from the sink bowl.
Slide the washer and nut over the tube from under the sink, and tighten the nut to
secure the carafe filler firmly into place.
Connecting
Install the filter following the separate filter kit installation instructions.
NOTE: You must separately supply and install an isolating valve in the supply line
before the connection to the product.
If the pressure exceeds 0.7 MPa (7 bar), a pressure reducer will be required. AQ3 is
available as an option (see options table page 4).
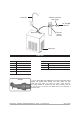
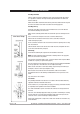
From the outlet of the filter housing connect the tube to the JG fitting marked INLET
on the top right rear of the chiller unit, trim to length before fitting.
Make sure all connections to John Guest fittings are pushed in past the O-ring to
full depth, at least 15-16mm (see diagrams on left).
Now measure and cut the tube from the Carafe filler, slide on the insulation
provided and connect to the JG fitting marked OUTLET on the top left rear of the
chiller.
Tap connection is now complete.
Precautions
The plumbing installation must be done in accordance with local Water Authority
regulations and these Installation Instructions.
As the installer, it is your responsibility to supply (if necessary) and install all valves
as required by local regulations and relevant standards.
The chiller and filtration systems are indoor units and must not be exposed to the
elements.
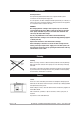
Take care, when bending rigid plastic tubing, to prevent it from kinking or crushing
around a bend. As it is plastic tubing containing water under mains pressure, be
careful not to nick, scratch or damage it during installation.
Cut the tube squarely with a sharp knife or tube cutter. Shake out and remove any
swarf and debris.
Installation Instructions
Installing the Chiller
Site the chiller unit into the cupboard as close to the proposed outlet tap position
as is possible to minimise the length of tubing exposed between the chiller unit
and the outlet tap.
Allow at least 50mm around the chiller unit to permit free airflow. Both the top and
the front of the chiller must remain accessible for servicing purposes.
Installing the Tap
Install the carafe filler at the back of the sink where there is a 45 mm wide flat
area within the draining area of the sink.
Make sure the selected position allows the carafe filler spout to overhang the sink
bowl.
John Guest Fittings