chapter 3:Setup Quickly Second: You need to select the OS type which you have installed. Third: Select the install item,shows as below: 1.Chipset driver: Outline the OS how the chipset components shall be configured. 2.Modem: If the M/B which you purchased integrated the Modem, you need to select this item to install the Modem driver.. 3.Sound chip drive: Our M/B integrated the onboard sound codec (AC97).
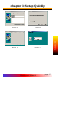
chapter 3:Setup Quickly THE SOUND CODEC IC (AC97) INTEGRATED ON YOU M/B ALC201A CS4299 CMI9738 CMI9739 3.5 How to enable 4ch or 5.1ch output 1) Please select the logo,which shows"C-media Audio Configuration",click the mouse left button,and soon the dialog box will be shown. 2) In the dialog box ,select the item of "4",which is the selection of four channel output.Click "ok",and four channel output is enabled.
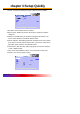
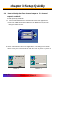
chapter 3:Setup Quickly 3.6 How to identity that Four channel output or 5.1 channel output is enabled? It's still explain by CMI9738. 1 First :install CMI9738 Four channel Audio driver and applications: a.Select the CMI9738 Audio installation in the Mainboard CD,and the dialog box will be shown: b. Select "Install Device Driver and Applications",The dialog boxes will be shown one by one in the list.Please click the "next" in picture 1--picture 5.
Picture 3 Picture 4 Picture 5 Picture 6 Mainboard Manual Setup Quickly chapter 3:Setup Quickly page 27
chapter 3:Setup Quickly c. At last the diagram will be shown.Click"Finish",and the installation of Audio Applications is over. d.Install Audio Driver.when the picture 2 is shown,click "ok",and restart your computer.The whole installation is over.
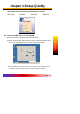
Chapter 3:Setup Quickly Open the application of"Muti-channel audio demo"in the menu of " C-media Audio". 3 Next diagram. 4 Click "Demo1" or "Demo2" Setup Quickly 2 and Audio output should happen in the Front speaker and Rear speaker.
chapter 3:Setup Quickly 3.7 How to set Super password and User password Please follow the steps as below to set the Super password and user password; 1) Press "DEL" key inter bios setup when boot-start; 2) In"Set Supervisor Password"set super password.Please enter according to the introduce. 3) In"Set User Password"set user password.Please enter according to the introduction. 4) After you finish the setting of password,you should set the option" Security Option",which lies in Advanced BIOS Features item.
chapter 4:BIOS Setting 4.1 AWARD BIOS Description The BIOS (Basic Input/Output system) provides the low-level support for the standard devices such as disk drives,serial and parallel ports.It contains codes for advanced features found on the system board such as virus and password protection. it is very important to configure the BIOS correctly;otherwise the system board according to the new hardware installed. * To configure the provided special feature of the BIOS.
chapter 4:BIOS Setting Award BIOS Setup Standard CMOS Feature Set time & date, hard disk drive type, type of floppy drive, Monitor type. Advanced CMOS Feature Select system boot sequence, floppy control, CPU cache settings, Shadow RAM. Advanced Chipset Feature Configure chipset specific options and features Integrated Peripherals Configure onboard I/O device addresses and operating modes. Power Management Setup Select various power saving options.
chapter 4:BIOS Setting Time / Date These fields provide you with the current date and time. Note that the hour is displayed as a 24-hour clock. For example, 1:00 PM is 13:00:00. Floppy Drive A, Floppy Drive B(A845DD,A845SD,A845E,P845SD) This option selects the type of floppy drives installed. Primary Master, Primary Slave, Secondary Master, Secondary Slave These options enter another menu for hard disk detection by click "Enter" key. Video This field allows you to select monitor type .
chapter 4:BIOS Setting 4.3 Advanced BIOS Features -3 BIOS Virus Warning Enabled / Disabled Virus Warning function. Default setting is "Disabled". CPU L1&L2 Cache Enables processor on-chip L1 and L2 cache memory. Default is "Enabled". Quick Power on Self Test When Enabled, BIOS will skip certain power-on self-test (POST) procedures (such as memory test above 1MB) to speed up the boot process. Default setting is "Disabled".
Boot Up Floppy Seek Specify whether floppy drive A: will perform a Seek operation at system boot. Default setting is "Disabled". Boot Up NumLock Status Set this option to "OFF" to turn the Num Lock key off when the computer is booted so you can use the arrow keys on both the numeric keypad and the keyboard. Default is "ON". Gate A20 Option Sets "Fast", lets chipset control Gate A20; Sets "Normal", lets a pin in the keyboard controller control Gate A20. Default setting is "Fast".
chapter 4:BIOS Setting 4.4 Advanced Chipset Features DRAM Timing Selectable Manual/By SPD.Select"By SPD" to allow BIOS to get the optimized timing data from the data stored on the DIMM modules.Otherwise,select"Manual"to configure the following timing constrains. CAS Latency Time Specifies the number of SCLKs between the time when the read command is sampled by DRAM and the Whitney Sample reads data from DRAM.Available setting are 1.5,2,2.5.
Memory Frequency For Set frequency of DIMM memory.Default is "AUTO". CPU Latency Timer Enables CPU BIST. Default is "Disabled". Buffer Strength Control This option allows the experience user to fine tune the DRAM control setting. Leave this setting as default will have more safe & stability performance. DRAM Read Thermal Mgmt Select "Enable" to allow Dram Read Thermal Mgmt to manage DRAM speed according to it's temperature.