
User's Manual


7 Quick
Steps
Please follow these steps in order to assure that your series of Mainboard
installation is successful. Please refer to the back chapters for further
information regarding boot-up and configurations. An anti-static wrist band
is recommended when handling electronic components, make sure your
work area is static free before you begin this section.
Page 11 Mainboard User's Manual
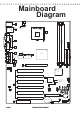
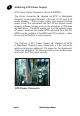
The Mainboard provides a 478-pin socket (S in Mainboard
Diagram), namely socket mPGA478B, for an easy CPU installa-
tion. Simply disengage the lever from the locking latch, lift it to
its vertical position. Match the triangle markings on both the
CPU and the mPGA478B socket. Carefully drop the CPU into the
socket such that all the CPU pins entered the holes in the socket.
Apply slight pressure if necessary. Make sure the CPU is level
with the surface of the socket. Maintain a slight pressure on the
CPU and rotate the lever back to its horizontal (or locking)
position, and snap the lever back to the locking latch.
The CPU should have a heat sink attached to prevent from
overheating. User should purchase those with fans attached.
The recommended heat sinks fan for the 478-pin processors
are those with three-pin connector (with three wire) that can be
connected to the fan header on the Mainboard. It provides the
+12 Volts D.C. power that is necessary for CPU cooling fan, and
a wire for fan speed detection.
Installing the CPU
7 Quick Steps