
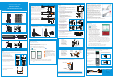
Installation Tips

Problem Solution
No picture / signal
• Ensure the wireless receiver is properly connected to the DVR.
• Ensure the Power Pack is properly inserted into the camera base.
• Ensure you have removed the PLEASE REMOVE label from the Power Pack.
• Connect the power adapter to your Power Pack to ensure the Power Pack is charged.
The LED indicator on the power pack glows green for full charge, red for less than full
charge.
• Remove obstructions between the receiver and camera. Materials such as brick,
concrete and wRRGFDQVLJQL¿FDntly impact the wireless signal strength.
•
Try repositioning the camera, receiver, or both to improve the reception. The receiver
can be wall mounted using the included double-sided tape or mounting screws.
Battery life is too
short
• Ensure the camera is not pointing at a high-traI¿FDrea. Position the camera so it
only captures areas of interest with no high-traI¿FDreas (e.g., a busy sidewalk or
roadway) visible in the image.
• Live video is being viewed too frequently. Viewing live video often will impact battery
performance.
• Ensure you have set an active area and distance setting for motion detection to
reduce false alarms. See “Optimizing Motion Detec
tion” for details.
• Battery life will vary based on temperature, settings and number of events.
Picture is dropping • Move the camera closer to the receiver.
• Try repositioning the camera, receiver, or both to improve the reception.
Picture is or has
become choppy
• Ensure the camera resolution is set to 720p using the RXCamView app or the DVR.
• Try moving the camera closer to the receiver.
• Remove obstructions between the receiver and camera.
Camera is not
detecting motion
• Your camera may be too far away from the area of interest. Try to keep the camera
within 20ft (6.1m) of the area you want to monitor.
• Review the “Installation Tips” and “Optimizing Motion Detection” sections to ensure
your camera is installed in an optimal location and motion detection is properly
con¿JXred.
Picture is too bright • Ensure your camera isn’t pointed directly at a source of light (e.g., sun or spot light).
• Move your camera to a different location.
Night vision is not
working
• The night vision activates when light levels drop. The area may have too much light.
Pictur
e is not clear • Check the camera lens for dirt, dust, spiderwebs. Clean the lens with a soft, clean
cloth.
• Too much environmental interference will affect picture clarity. Move your camera to
a different location.
Bright spot in video
when viewing at night
• Night vision reÀHcts when pointing a camera through a window. Move the camera to
a different location.
Troubleshooting
Before You Start
• Upgrade your recorGHU¿Umware and mobile app to the latest
versions.
• Please note that an upload speed of 3.5Mbps is
r
equired for remote
video streaming. Up to 3 devices may connect to the system at the
same time.
• Ensure you have completed initial setup of the RXCamView app and
the recorder as detailed in the Quick Connection Guide.
Main menu
Playback Controls:
Video timeline.
Tap to start
playback from
the selected
time. Pinch or
sprHDG¿QJHrs
to change the
time period.
Playback
date
2. Tap , then tap Remote Setting,select a device.
Tap on Device configure the following as needed:
3.
4. Tap SAVE to save settings.
2.
3.
Tap , then tap Device list.
4. Tap Save to save settings.
Favorite Group
Battery strength
indicator
Wireless signal
strength indicator
Split-screen options
Split-screen options
Save a snapshot
of the current
live view
Tap to start manual
recording; tap again
to stop
4. Tap Play to begin playback.
a. Tap to select playback type.
b. Tap a date from the calender to filter recodings by type.
Playback
time
Video
playback
Slower
Faster
Next Frame
Snapshot
Device
Type
Manual
Recording
Mute / Unmute
Mute / Unmute
Device Intercom
You can use playback mode in portrait or landscape mode. Landscape mode
shown below:
Recorder: Using the Mouse
1. LEFT-CLICK:
• During split-screen display mode: Double-click an
individual channel to view it in full-screen. Double-click
again to return to the split-screen display mode.
• While navigating menus: Click to open a menu option.
2. RIGHT-CLICK:
• During live view: Right-click anywhere on the screen
to show the menu-bar.
• While navigating menus: Right-click to exit menus.
3. SCROLL WHEEL:
• While navigating menus: Scroll to move up / down
through the menu content.
12
3
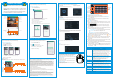
Recorder: Initial Setup Wizard
Recorder: Search, Playback & Backup
RXCamView : App Overview
Play back recorded video using the RXCamView app.
To play back recorded video:
1.
Launch the RXCamView app.
2.
Tap , then tap Playback
.
3. Set search options for playback:
RXCamView : Remote Settings
RXCamView : Playback
Change camera settings using the RXCamView app.
To change camera settings:
1. Launch the
RXCamView
app.
RXCamView : Device Settings
Change recorder name using the RXCamView app.
1. Launch the RXCamView app.
Wizard setting menu includes: start wizard page, Network, Network Configuration,
Date/Time, IPC Setup, Disk, Resolution , Mobile and Summary.
1. Start wizard
2. Network Configuration
Click the Start Wizard to proceed to the next step
3. Date/Time
This menu allows you to configure the Date, Time, Date Format, Time Format, Time Zone,
NTP and DST.
Date and Time
Click on the calendar icon to set the current system date.
NTP
NTP stands for Network Time Protocol. This feature allows you to synchronize
the date and time automatically on the DVR over Internet. Therefore, the DVR
needs to be connected to the Internet.
Check the “NTP” box, and select the NTP server.
DST
DST stands for Daylight Savings Time.
Select
channels to
playback
Double-click
any event
to begin
playback
Click to
search for
recordings
To search, play & back up for events:
1. Choose the date & time you want to search.
2. Check the recording types you want to search, or check Search
Type to choose all.
3. Choose the channels you want to search, or check Channel to
choose all channels.
4. Click icon to start search.
5. Events fitting your search criteria are displayed in list form. You can
double click the left button of your mouse upon one of the events to
play the video immediately.
6. Click icons in the bottom-right corner of the
menu to browse between pages of events, or input the page you
want to browse.
7. You can switch the view of list form in by clicking below icons which
is show at the right bottom corner of the screen:
Thumbnails view. You can view the snapshots of the events.
List view. The events will be displayed in list.
Detailed view. You can view the details of the events.
In the detailed view mode, you can lock the video events to keep
events from being overwritten in the hard drive. Click the icon to
lock or click to unlock the events.
8. When you click the left button of your mouse upon one of the event,
system will show the event information on the left bottom corner
of the screen.
9. Check the box next the number of the event to select files, or check
the box next Select to select all events in the page.
10.The number of selected files, total size information will be displayed
at the right bottom of the screen.
11. After selecting file, you can click icon to save the video to USB
flash drive. Or click icon into event playback control window to
play the video.
a. Date and Time: configure System time, Format,DST,NTP.
b. HDD: format & overwrite Setting.
c. Record Schedule: congfigure Record Schedule.
d. Network: configure network parameter.
e. Motion: configure motion detection setting. See the "Optimizing Motion Detection".
Select a Device, enter a name of your choice
for the recoder (e.g., wire-free system).
Tap to start live view
Tap to start live view
Date and time
ChannelName
FCC Statement