
User's Guide
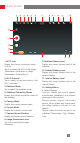
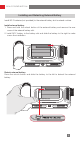
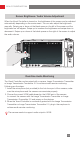
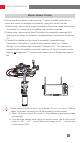
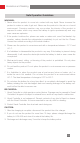
Table Of Contents

11
How to Install and Use
Motion Sensor Control
As the image shown below, single press the F1 button to enable motion sensor
control and control the stabilizer movement by moving the Visual Controller.
1. Before using, make sure the Image Transmission Transmitter/Image Transmission
Transmitter 2.0, camera, and the stabilizer are correctly connected.
2. Before using, make sure the Visual Controller has successfully performed Wi-Fi
pairing with the Image Transmission Transmitter/Image Transmission Transmitter
2.0.
3. Connect the stabilizer and the Image Transmission Transmitter/Image
Transmission Transmitter 2.0 correctly and power on, select the “Camera
Settings” in the stabilizer menu and select “Extension Port”. The connection is
successful when the stabilizer connection status on the Visual Controller monitor
displays Single press F1 to enter motion sensor control. Single press again to
exit.
① Motion sensor of the roll axis is off as default. To turn it on, go to “Settings
Menu” and select the setting for the follow speed of motion sensor.
② When the motion sensor is turned on, the stabilizer enters locking mode
automatically.
③ To protect the camera when using the motion sensor, the tilt axis control
range is +135 ° ~-60 ° ; the roll axis control range is ±45 ° ; the pan axis
control range is 360° .