ZHIYUN-EN-v1.
Contents ■■ Packing list Packing list······················································································1 ■■ Get to know the CRANE 2S Get to know the CRANE 2S·····························································2 Port introduction··············································································3 ■■ Charging and Battery Charger and battery description·······················································4 Charging Procedure·············································
■■ How to Use the App App Download················································································25 Connect and activate·······································································25 ■■ APP Operations Main App Features··········································································26 ■■ Calibration and firmware upgrade When is Calibration Required···························································27 How to initialize··············································
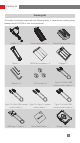
Packing list Packing list The product package comes with the following items. If there are any missing items, please contact ZHIYUN or your local distributor.
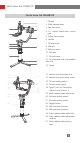
Get to know the CRANE 2S Get to know the CRANE 2S 7 8 1 1. Tilt axis 2. Quick release base 3. Pan axis motor 9 2 10 4.1/4” screw thread with crown gear 5. Follow focus wheel 6. Handle 7. Tilt axis motor 3 4 5 11 8. Roll axis 9. Roll axis motor 10. Pan axis 6 11. Control panel 12 13 16 17 18 19 20 21 13. Tripod 14. Vertical shooting safety lock 14 15 12.1/4 threaded hole (compatible with 3/8) 23 15. Vertical shooting locking screw 16. Tilt axis locking switch 24 25 26 27 17.
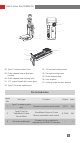
Get to know the CRANE 2S 31 32 28 29 30 33 34 35 36 37 28. Type-C camera control port 33. 1/4 camera locking screw 29. Quick release base adjustment module 34. Camera backing base 30. Quick release base locking latch 36. Lens support 31. 1/4” screw thread with crown gear 32. Type-C firmware update port 35. Quick release plate 37. Locking screw for lens support Port introduction Serial No.
Charging and Battery Before using the CRANE 2S for the first time, use the charging device provided in the package to fully charge the batteries so as to activate them and ensure the smooth use of the product. Charger and battery description Charger specifications Battery specifications Name: 18650 Li-ion battery (three Name: 18650 Li-ion battery slots) Model: INR 18650-26EC Model: CH18650-3B Capacity: 2600mAh Input: 5V=2400mA Voltage: 3.7V Output: 4.
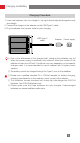
Charging and Battery Charging Procedure 1. Insert the batteries into the charger in the right direction(positive/negative end) accordingly. 2. Connect the charger to the adapter via the USB Type-C cable. 3. Plug the adapter into a power outlet to start charging. USB Type-C cable Adapter Power supply ① Due to the differences of the charger itself, charging the batteries may fail when the power supply is insufficient (for instance, when the current of the adapter is lower than 500mA).
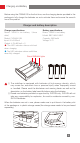
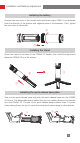
Installation and Balance Adjustment Installing the battery Unscrew the rear cover of the handle and install three original 18650 Li-ion batteries (note the direction of the positive and negative poles of the batteries). Then, tighten the rear cover of the handle. ② ① Installing the tripod Screw the tripod to the base of the CRANE 2S handle, then unfold the tripod and place the CRANE 2S on a flat surface.
Installation and Balance Adjustment Installing the camera 1.Mount the camera on the camera backing base and quick release plate, and tighten the bottom screw. Mount the lens support to the front end of the quick release plate and tighten the screw. You may decide whether or not to use the camera backing base depending on your camera-lens combo. You will need the camera backing base in the following situations: ① When using smaller and lighter cameras, such as the Sony 6000 series cameras.
Installation and Balance Adjustment Connecting the control cable Control cable Type-C to Micro USB name LN-MBUC-A01 Camera Micro USB interface type Type-C to Mini Type-C to Multi Type-C to Type-C USB USB LN-UCUC-A01 LN-NBUC-A01 Mini USB LN-UCUS-A01 Type-C Canon Multi USB Camera brand Nikon Panasonic Nikon and model D850 5D Mark Ⅳ 6D Mark Ⅱ EOS R GH5 Z6 A7RM3 Sony Take photo √ √ √ √ √ √ √ Take video √ √ √ √ √ √ √ Live Preview √ √ √ × × × × AV √ √ √ √ √
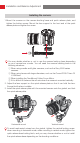
Installation and Balance Adjustment Balance adjustment ① The CRANE 2S has three lock switches corresponding to each of the three motor shafts. You can lock the CRANE 2S in the mounting or storage position for your convenience. Make sure that the three lock switches are unlocked when powering on to increase stability. Before balance adjustment, you can lock the CRANE 2S in the mounting position and release the locks of each axis in stages to facilitate balance adjustment.
Installation and Balance Adjustment 1. Tilt axis horizontal balance adjustment. Unlock the tilt axis and Quick Release Plate Latch, push the camera to move forward or backward until the camera can stay still and almost level with its lens facing front (as shown below). Complete this step by tightening up Quick Release Plate Latch. 2. Tilt axis vertical balance adjustment.
Installation and Balance Adjustment 3. Roll axis balance adjustment. Unlock the roll axis, and slightly loosen the roll axis thumb screw under the quick release plate, push the camera to move left or right until the camera can stay still and horizontal to the ground. Complete this step by tightening up thumb screw. 4. Pan axis balance adjustment. Unlock the pan axis, slightly loosen the thumb screw on it, then adjust the pan axis until it stays still and horizontal to the ground.
Using the CRANE 2S Quick Release Plate Adjustment Module 1. Due to mechanical friction wear after a long time of use, the quick release plate locking latch (quick release base locking latch) can still move back and forth (left and right) after has been locked. 2. Now, you can keep pushing the adjustment module as shown in ① , adjust the latch until it is loosened as shown in ② , then let go of the adjustment module as shown in ① .
Using the CRANE 2S How to use the hex wrench This product comes with hex wrenches in three sizes. The M1.5 and M2 wrenches can be used for routine maintenance of the CRANE 2S. Tighten the screws as necessary when they become loose. The M4 wrench can be used to lock the 1/4 screw of the quick release plate. M2 M4 M1.
Using the CRANE 2S ① Display screen • Displays status information and camera control parameters for the CRANE 2S (see display screen description for details). ② Stabilizer joystick • Push the joystick up and down, and left and right to control the stabilizer movement (does not work in PhoneGo mode or Point of View mode). ③ Power button/record button • Long press the power button for three seconds to turn the CRANE 2S on or off. • Press once to start/stop recording.
Using the CRANE 2S Display screen description Camera parameters are not adjustable Camera parameters are adjustable 菜单界面 *Motor torque *电机⼒矩 Camera Settings 相机设置 Parameter Settings 参数设置 Sony camera connection control interface Menu interface 请激活 Activation prompt interface Standby interface Axis lock prompt interface 15
Using the CRANE 2S Icon description: Camera successfully connected to gimbal Camera is in video mode Camera is in photo mode Current battery level Indicates that the locks on the three axes have not been released and an alarm will sound (release the locks, and press and hold the M button to resume operation) Standby icon, displayed when the motor is in sleep mode You are in Pan Following mode You are in Locking mode You are in Point of View mode You are in Vortex mode You are in Following mode You are in Go
Using the CRANE 2S Menu options description Automatic parameter tuning Tilt axis Roll axis Custom Motor Torque Pan axis Low torque Level Medium torque High torque Close (Close port) Canon camera Power supply off Sony camera Power supply on Panasonic camera Nikon camera Camera Settings ccs (extension) Fuji camera Olympus zcam bmpcc sigma Tilt axis Control speed of joystick Roll axis Pan axis Speed Tilt axis Follow speed of motor Roll axis Pan axis Parameter Settings Tilt axis Smoothness Roll a
Using the CRANE 2S Low Sensitivity Medium AB point Set point B High Set point A TransMount Follow Focus Motor max/zoom Settings Clear AB point Reverse Disable Enable (control in reverse direction) Start upgrade Firmware Upgrade Force upgrade lite/focus Wheel Functions max/zoom Electronic follow focus Disable wheel Wheel Settings Handle control Priority External control Disable Reverse (control the wheel in Enable reverse direction) Hold to trigger Button settings Trigger button Pre
Using the CRANE 2S Motor Torque Adjustment When using the CRANE 2S, you have to adjust the appropriate motor velocity parameters according to the weight of your camera and lens, so that the CRANE 2S can be used in its ideal state. We recommend using automatic tuning first. The definitions and operation methods of the three motor torque methods are as follows: Auto torque adjustment: Automatically adjusts the power of the motor according to the weight of the camera and lens.
Using the CRANE 2S Operation Modes The red circle indicates that the motor will rotate along with the grip movement. The gray circle means the motor is locked and cannot move along with the grip movement. Pan Following mode (PF): Press the M button The tilt axis and roll axis motors are locked, and the camera rotates with the handle while panning horizontally. Push the joystick up/down to control the tilt axis angle, and push it left/right to control the pan axis of the camera.
Using the CRANE 2S Point of View mode (POV): Press the M button twice All three motors move when the handle is rotated. tilt俯仰轴 axis Roll横滚轴 axis Pan axis 航向轴 Vortex mode (V): Press the M button twice The tilt axis motor rotates upward by 90 ° , and the tilt axis, roll axis and pan axis motors follow the rotation of the handle. Push the joystick to the left/right to control the rotation of the pan axis.
Using the CRANE 2S Go mode (GO): Press the M button thrice The roll axis motor is locked, and the tilt axis and pan axis motors quickly follow the rotation of the handle. 俯仰轴 tilt axis 横滚轴 Roll axis 航向轴 Pan axis Following mode (F): Press or press and hold the trigger button The roll axis motor is locked, and the tilt axis and pan axis motors follow the rotation of the handle. Push the joystick up/down to change the roll angle.
Using the CRANE 2S Portrait Mode: Mount the camera on the tilt arm for Portrait Mode; refer to the Landscape Mode for the leveling sequence steps in Portrait Mode. Landscape Mode Portrait Mode Inverted mode: Rotate the handle 180 degrees for inverted mode. Upright mode Inverted mode If the handle cannot be rotated directly, you can mount it upside down and level it before turning the device on.
Using the CRANE 2S Manual Repositioning In Pan Following mode (PF) and Locking mode (L), the camera can be rotated by a certain angle by hand, and the camera angle will be fixed at that angle after you release the camera. The angle of the tilt axis can be manually adjusted in Pan Following mode (PF), and the angles of the tilt axis and pan axis can be manually adjusted in Locking mode (L).
How to Use the App App Download Search for the “ZY Play” app in the app store or use your mobile device to scan the QR code on the left to download and install the app (Android 5.0 or higher; iOS 9.0 or higher). ① Users can make better use of the various functions of the CRANE 2S with the dedicated “ZY Play” app. ② ZY Cami is subject to updates without notice. Please always refer to the latest version. Connect and activate 1. Power on the CRANE 2S and turn on Bluetooth on your smartphone. 2.
APP Operations CRANE 2S_XXXX 3 4 Main App Features Stabilizer Mode Video and Photo Stabilizer Parameters SettingsCustomized Scene Mode Stabilizer calibration Timelapse ZY Play Panorama 26
Calibration and firmware upgrade When is Calibration Required Calibrate the CRANE 2S as needed. When to calibrate 1. Slight deviation is found in the tilt angle of the camera in level position after turning on. 2. Slight deviation is found in the roll angle of the camera in level position after turning on. 3. Frequent small angle correction is found when the camera is in level position while the stabilizer stays still. 1.
Calibration and firmware upgrade How to perform six-side calibration 1. Six-side calibration via APP: According to the method introduced in "APP Operations", please connect the stabilizer with APP, and enter "Calibration", then conduct the six-side calibration according to the prompt. 2. Six-side calibration via "Zhiyun Gimbal Tools" Power on the stabilizer and turn it to standby mode. Connect the Type-C port on the stabilizer with a computer via a Type-C USB cable.
Calibration and firmware upgrade STEP 1 STEP 2 STEP 3 STEP 4 STEP 5 STEP 6 29
Calibration and firmware upgrade Motor Fine-tuning Start the CRANE 2S, click the menu button, rotate the dial to "angle", and press the right button to select it. Then, rotate the dial again to the axis you wish to adjust, and press the right button to select it. Rotate the wheel to adjust to an appropriate value. Finally, press the left button to exit and save the changes. When the display panel shows the " √ " icon, it means that the fine angle adjustment has been completed.
Product Specifications Product model: CR113 Specifications Item Minimum Standard Maximum Operating voltage 9.8V 11.1V 12.6V Operating current 160mA - 6000mA Power output voltage - 5V - Power output current - 1A - Tilt mechanical range -91° - +155° +237.5° Roll Mechanical Range -57.
Product Specifications Laboratory data 1: The battery life was tested to be 12h in an environment with ambient temperature of 25° C; CRANE 2S + fully charged 18650-2600mAh 3.7v 9.62Wh batteries; Canon EOS R+28-70mm F2 mounted and leveled with static placement. Laboratory data 2: The charging time was tested to be 4h in an environment with ambient temperature of 25° C and using a 5V/2.4A power adapter. The charging time varies according to different environments, and actual results may be different.
Disclaimer and Warnings Thank you for purchasing the CRANE 2S. The information contained herein relates to your safety and your legal rights and responsibilities. Read this entire document carefully to ensure proper configuration before use. Failure to read and follow the instructions and warnings herein may result in serious injury to you or bystanders, or damage to the CRANE 2S or other property.
Disclaimer and Warnings Safe Operation Guidelines Note: 1. The CRANE 2S is a high-precision control device. Damage may be caused to the CRANE 2S if it is dropped or subject to external force, and this may result in the device malfunctioning. 2. Make sure the rotation of the gimbal axes are not blocked by external force when CRANE 2S is turned on. 3. The CRANE 2S is not waterproof. Do not let the CRANE 2S come into contact with any kind of liquid, including cleaning liquids.
Disclaimer and Warnings 8. Do not disassemble or use any sharp object to puncture the battery in any way. Otherwise, the battery may leak, catch fire or explode. 9. Do not mechanically strike, crush, or throw the battery. Do not place heavy objects on the battery or charger. 10.Electrolytes inside the battery are highly corrosive. In case of accidental contact of any electrolytes with your skin or eyes, rinse immediately with water for at least 15 minutes and seek medical advice as soon as possible. 11.
Disclaimer and Warnings Battery Maintenance 1. Do not over-charge or over-discharge the battery, which will damage the battery; 2. The battery performance will be affected for not being used for a long time; 3. Never use the battery when the temperature is too high or too low; 4. Do not store the battery in any environment with a temperature of over 60℃ . Battery Disposal 1. Please fully discharge the battery before putting it in the designated recycling bin.
Warranty Terms Warranty Period 1. Customers are entitled to replacement or free repair service in case of quality defect(s) found in the product within 15 days upon receipt of the product. 2. Customers are entitled to free repair service from ZHIYUN for any product proven defective in material or workmanship that results in product failure during normal consumer usage and conditions within the valid warranty period, which is 12 months counting from the date of selling.
Contact Card Website Weibo Vimeo Google+ Facebook (Zhiyun Support) Facebook (Zhiyun Tech) Youku Youtube Wechat Instagram 38
Contact Card Tel: +86 400 900 6868 USA Hotline: +1 808-319-6137,9:00-18:00 GMT-7,Mon-Fri Europe Hotline: +49(0)61018132180,10:00-17:00 GMT+1,Mon-Fri Web: www.zhiyun-tech.com E-mail: service@zhiyun-tech.com Address: 09 Huangtong Road, Tieshan Industrial Zone, Qixing District, Guilin, 541004, Guangxi, China. Certificate of Quality CertificateofQuality This product is confirmed to meet quality standards and permitted for sale after strict inspection. QC Inspector: Please download the latest version from www.