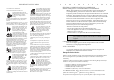
IMPORTANT SAFEGUARDS 1. Read all of these instructions. 2. Save these instructions for later use. 3. Unplug this monitor from the wall outlet before cleaning. Do not use liquid cleaners or aerosol cleaners. Use a damp cloth for cleaning. 4. Do not use attachments not recommended by the monitor manufacturer as they may cause hazards. 5. Do not use this monitor near water, e.g., near a bathtub, washbowl, kitchen sink, or laundry tub, in a wet basement, or near a swimming pool, etc. 6.
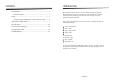
CONTENTS Introduction ............................................................................. 1 Product Features ................................................................. 2 Setup ......................................................................................... 3 INTRODUCTION This manual explains how to correctly install, operate and get the best performance from your monitor.
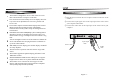
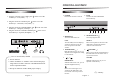
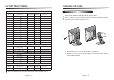
SETUP PRODUCT FEATURES CONNECTING THE 15 PIN SIGNAL CABLE AND POWER CORD The monitor is designed for use in a small work area or for those who need more work space on the desk. The convenient and user-friendly on-screen display allows for easy and accurate adjustments of screen size, position and screen color. The monitor complies with the VESA Display Data Channel (DDC) specification for Plug and Play compatibility. Advanced microcircuitry makes setup and configuration fast and effortless.
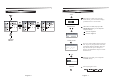
OPERATION & ADJUSTMENT CONNECTING THE OTHERS CONTROL PANEL 1. Plug the connector to the S-Video port 1 on the rear of the monitor (ex : VCR, DVD , ---). 2 AUTO Launches the AUTO TRACKING function directly. 1 POWER Switches the monitor on and off. 2. Plug the connector to the RCA port 2 on the rear of the monitor (ex : Camcorder, VCR, DVD, ---). 3. Plug the connector to AUDIO INPUT port 3 on the rear of the monitor (ex : Computer, CD Player, ---). / 4.
HOT KEY KEY PROCESS AUTO When there is no OSD, if you press this AUTO button, you can use the best display performance fit for a current mode. AU TO T R AC K I N G BRIGHTNESS When there is no OSD, if you press this BRIGHTNESS button, you can adjust the brightness directly. : decreases brightness 1024 X 768 75Hz Brightness 100 - : increases brightness + POWER LIGHT 1024 X 768 75Hz Signal Source Mode Select PC Game Movie Reset YES NO The screen will be brightened progressively by 10%.
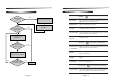
OSD FUNCTIONS WITH USING PC ADJUSTMENT PROCEDURE COLOR No Is the H.Size proper? Adjust the CLOCK control. Yes Is the noise displayed on the screen? Perform the AUTO POSITION. No Yes Perform the AUTO TRACKING. CONTRAST Adjust the contrast of image, the difference between light and dark areas on the screen. BRIGHTNESS Adjust the brightness of image. GAMMA Adjust the gamma correction. COLOR TEMP. Choose different preset color temperatures or set your own customized color parameters.
OSD FUNCTIONS WITH USING VIDEO and S-VIDEO OSD MENU LANGUAGE PICTURE OSD CONTRAST Adjust the contrast of image. BRIGHTNESS Adjust the brightness of image. Select language for OSD. OSD H &V POS. Adjust the OSD position horizontally (left or right) and vertically (up or down). SATURATION Adjust saturation of image. OSD TIMER Adjust the display OSD Menu. HUE Adjust the hues of image. Tranlucent Adjust the OSD.
SPECIFICATIONS SELF DIAGNOSIS Panel If there is no image, the Self Diagnosis screen will be displayed. Self Diagnosis function checks if the status of the monitor screen is No Signal, Out of range or None support . 1 2 No Signal screen is displayed when the DSub signal connector is connected but the status of the monitor is on DPMS mode. Out of Range screen is displayed when the applied frequency is under or over normal range.
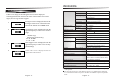
FACTORY PRESET TIMINGS CHANGING THE STAND Removing Original Stand VESA MODES VGA Resolution (dots X lines) 640 X 480 a 60Hz VGA Mode H.Freq (KHz) V.Freq (Hz) Remark 31.5 60 Non-interlaced 640 X 480 a 72Hz 37.9 72 Non-interlaced VGA 640 X 480 a 75Hz 37.5 75 Non-interlaced SVGA 800 X 600 a 56Hz 800 X 600 a 60Hz 35.2 56 Non-interlaced 37.9 60 Non-interlaced 800 X 600 a 72Hz 800 X 600 a 75Hz 48.1 72 Non-interlaced SVGA 46.9 75 Non-interlaced XGA 1024 X 768 a 60Hz 48.
TROBLESHOOTING Attaching the monitor with the arm-stand(option) Symptom Surface for stand installation Support stand Picture is jitterd. Adjust Clock to set the screen position and adjust Clock fine until a noise isn’t displayed. No picture. Check if power switch and computer power switch are in the on position. Check if the signal cable is correctly connected to the video card. Tighten up screws at the locations indicated by arrows.
Symptom No sound. Check Check the audio cable are correctly connected to the computer. Adjust the volume after checking the sound is muted. Check the audio system in the computer. Low sound. Adjust the volume on the OSD Menu. Adjust the volume of the sound card in the computer. No video. Check if the video cable is correctly connected to the computer and set to the video mode.
S/N:XL78600906