
Quick Guide
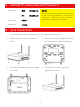
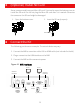
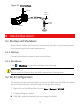
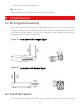
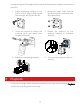
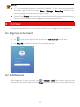
Table Of Contents
- 1 Default IP, Username and Password
- 2 Disk Installation
- 3 (Optional) Install SD Card
- 4 Connect the Kit
- 5 Device Operation
- CAUTION!
- Do not disconnect power when the NVR is operating or shutting down.
- CAUTION!
- The NVR's wireless NIC IP must be in a different network segment with its LAN IP address.
- NOTE!
- After SSID or password are changed on the NVR, the new SSID or password will be synchronized to online cameras. For offline cameras, the changed settings cannot be synchronized, and you need to pair the camera with the NVR again. See 5.3 Pair Devices Again for details.
- NOTE!
- The following methods are also applicable if you pair a camera not in the kit with the NVR.
- NOTE!
- The reset button only works in 1-10 minutes after the camera is powered on. If you fails to press the button within the time range, you need to power off the camera and then on again to restore the defaults.
- NOTE!
- This function works within 3 minutes after the camera restores defaults. So, if the camera is not paired successfully within this time, please restart the camera or try other methods.
- 6 Install Devices
- 7 Playback
- NOTE!
- 8 EZView
- 9 Web Login
- Disclaimer and Safety Warnings

6
5. Wait for the camera to get online.
Use EZView
Please refer to 8.5 Pair Camera and NVR for detailed steps.
6 Install Devices
6.1 Wi-Fi Signal Connectivity
The antenna sends Wi-Fi signals in all directions around it. Wi-Fi connectivity is the
best when antennas are parallel with each other, and is the weakest when the top of
an antenna points directly to the top of another. Please arrange the antennas
properly to improve Wi-Fi connectivity.
Figure 6-1 Installation with Strongest Signal
Figure 6-2 Installation with Weakest Signal
6.2 Install the Camera
The following part takes wall mount as an example. Make sure the wall is strong