
Quick Guide
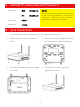
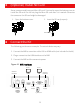
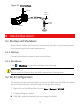
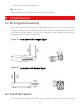
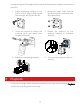
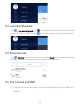
Table Of Contents
- 1 Default IP, Username and Password
- 2 Disk Installation
- 3 (Optional) Install SD Card
- 4 Connect the Kit
- 5 Device Operation
- CAUTION!
- Do not disconnect power when the NVR is operating or shutting down.
- CAUTION!
- The NVR's wireless NIC IP must be in a different network segment with its LAN IP address.
- NOTE!
- After SSID or password are changed on the NVR, the new SSID or password will be synchronized to online cameras. For offline cameras, the changed settings cannot be synchronized, and you need to pair the camera with the NVR again. See 5.3 Pair Devices Again for details.
- NOTE!
- The following methods are also applicable if you pair a camera not in the kit with the NVR.
- NOTE!
- The reset button only works in 1-10 minutes after the camera is powered on. If you fails to press the button within the time range, you need to power off the camera and then on again to restore the defaults.
- NOTE!
- This function works within 3 minutes after the camera restores defaults. So, if the camera is not paired successfully within this time, please restart the camera or try other methods.
- 6 Install Devices
- 7 Playback
- NOTE!
- 8 EZView
- 9 Web Login
- Disclaimer and Safety Warnings

3
Figure 4-2 IPC Interfaces
5 Device Operation
5.1 Startup and Shutdown
Make sure the cables are connected correctly and the device is grounded properly.
Use a power supply that meets requirements.
5.1.1 Startup
Connect the devices to power to start up the devices.
5.1.2 Shutdown
Click > Shutdown on the screen toolbar in live view page.
CAUTION!
Do not disconnect power when the NVR is operating or shutting down.
5.2 Wi-Fi Configuration
The camera will get online and start live view on the NVR once the NVR and camera
are connected to power. Follow the steps to change Wi-Fi settings.
1. Right-click on the NVR and then choose Menu > Network > Wi-Fi AP.
2. Change settings as needed:
SSID: MAC address by default, you can change as needed.
IP
Network
Network
interface
Powe
r
interface
Antenna
SD card