
Quick Guide
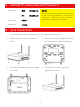
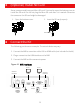
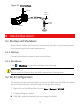
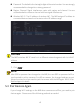
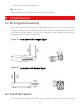
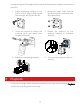
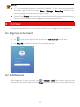
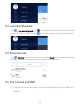
Table Of Contents
- 1 Default IP, Username and Password
- 2 Disk Installation
- 3 (Optional) Install SD Card
- 4 Connect the Kit
- 5 Device Operation
- CAUTION!
- Do not disconnect power when the NVR is operating or shutting down.
- CAUTION!
- The NVR's wireless NIC IP must be in a different network segment with its LAN IP address.
- NOTE!
- After SSID or password are changed on the NVR, the new SSID or password will be synchronized to online cameras. For offline cameras, the changed settings cannot be synchronized, and you need to pair the camera with the NVR again. See 5.3 Pair Devices Again for details.
- NOTE!
- The following methods are also applicable if you pair a camera not in the kit with the NVR.
- NOTE!
- The reset button only works in 1-10 minutes after the camera is powered on. If you fails to press the button within the time range, you need to power off the camera and then on again to restore the defaults.
- NOTE!
- This function works within 3 minutes after the camera restores defaults. So, if the camera is not paired successfully within this time, please restart the camera or try other methods.
- 6 Install Devices
- 7 Playback
- NOTE!
- 8 EZView
- 9 Web Login
- Disclaimer and Safety Warnings

1
1 Default IP, Username and Password
IP address:
NVR
192.168.1.30
NOTE!
For security, you are strongly recommended
to set a strong password of at least nine
characters including all
three elements:
digits, letters and special characters.
IPC
192.168.1.13
Username:
admin
Password:
123456
2 Disk Installation
The illustrations are for reference only. The actual device may vary.
1. Loosen the screws and remove the
cover.
2. Secure the disk by fixing the screws to
the screw holes shown in the figure.
3. Connect data cables and power cables
to the disk.
4. Put the cover back in place and
tighten the screws.