
Quick Guide
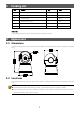
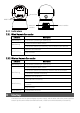
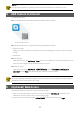
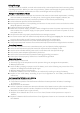
Table Of Contents
- 1 Packing List
- 2 Appearance
- NOTE!
- 3 Startup
- NOTE!
- Do not use the camera in humidity environment. Please protect your camera from rain.
- 4 Add Camera to Uniarch
- NOTE!
- Due to the upgrade and update of app, the actual operations may be different. Please operate in accordance with the instructions of the app.
- 5 (Optional) Web Access
- NOTE!
- 6 (Optional) Add Camera to NVR
- NOTE!
- Disclaimer and Safety Warnings

2
RESET button
Power interface
SD card slot
*Network
interface
2.3 Indicators
2.3.1 Wired Network Connection
LED status
Description
Red steady on The camera is powering on (starting up).
Red flashing
Press and hold the RESET button.
The camera started up successfully, and no network cable detected.
Blue flashing
Network cable detected.
Play live video.
2.3.2 Wireless Network Connection
LED status
Description
Red steady on The camera is powering on (starting up).
Red flashing
Press and hold the RESET button.
The camera started up successfully, and Wi-Fi was not connected.
The camera restarted successfully.
Failed to connect to Wi-Fi.
Blue flashing
Read QR code successfully.
Connected to Wi-Fi, but failed to connect to the server or the Wi-Fi did
not work.
Play live video.
Blue steady on Connected to the server.
3 Startup
Connect one end of the power adapter to power supply, and the other end to the power interface
to start up the camera. When the LED flashes red, it means the camera started up successfully.