
Quick Guide

12
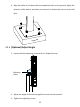
4. Device Startup
After the device is installed correctly, connect one end of the power adapter
(purchased or prepared) to the mains supply and the other end to the power
interface of the face recognition access control terminal, and then start the device.
The display screen of the outdoor monitor is energized and lights up, and the live
view is displayed on the screen, indicating that the device is started successfully.
5. Web Login
You can log in to the Web page of the access control terminal to manage and
maintain the device. For detailed operations, see the Face Recognition Access
Control Terminal User Manual.
1. On a client PC, open the Internet Explorer (IE9 or later), enter the IP address of
the device 192.168.1.13 into the address bar, and press Enter.
2. In the login dialog box, enter the username (admin by default) and password
(123456 by default), and click Login to access the Web page.
NOTE!
⚫ DHCP is enabled by default. If a DHCP server is used in the network
environment, an IP address may be dynamically assigned to the device. Log in
with the actual IP address.
⚫ At initial login, the system will prompt you to install a plugin. Close all browsers
when installing the plugin. Follow instructions on the page to complete the
plugin installation, and then restart the Internet Explorer to log in to the
system.
⚫ The default password of this product is used only for initial login. You are
required to change the default password after initial login to ensure security.
Set a strong password of at least nine characters including all three elements:
digits, letters and special characters.
⚫ If the password has been changed, use the new password to log in to the Web
interface.