
User's Manual

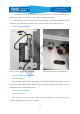


Table Of Contents
- Chapter 1 Overview
- Chapter 2 Installation
- 2.1 Installation protection
- 2.2 Unpacking inspection
- 2.3 Installation of necessary equipment
- 2.4 Antenna installation
- 2.5 Gateway body installation
- 2.6 Power supply installation
- 2.7 Grounding cable installation
- 2.8 Antenna extension scheme
- 2.9 Interface waterproofing
- 2.10 Pole and wall mounting
- 2.12 Antenna replacement
- Note:Replacement step reference to 2.4 Antenna ins
- Chapter 3 Broadcast Compliance Instructions
- Chapter 4 Precautions
- Chapter 5 Troubleshooting
- Notice to Users
- Contact Information

20
IoT Interworking
Make Your Life Smart
Security Code
3. Immediately coat the contact surface with a layer of antioxidant compound.
4. Use M6 screws, bolts, and washers to install the grounding cable to the antenna feeder through
the grounding hole.
5. Connect the other end of the grounding cable as described above.
2.8 Antenna extension scheme
Figure 10 Antenna extension cable installation
The LoRa antenna can be mounted to the desired position via an RF extension cable (optional
accessory) for a better signal coverage quality. When fixed, the antenna can be fixed to the wall or pole