
User's Manual Part 2
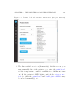
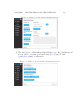
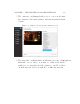

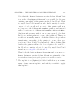
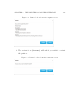

Table Of Contents
- The printer local web interface
- CAD software – create your own objects
- STEAMtrax curriculum
- Operational tips
- Updating the printer
- Printer maintenance
- Troubleshooting
- Appendices
- Polar3D printer specification sheet
- Polar3D printer diagram
- Connecting the printer directly to your device
- Glossary
- Index
CHAPTER 5. THE PRINTER LOCAL WEB INTERFACE 180
5.1 Navigating through the printer l ocal web
interface
Connecting to the printer’s local IP address will put you at the
network screen. This is the same screen you would see if you
selected the networking icon on the l eft menu; see 6.
The tabs/icons at the left of t h e screen select additional
screens:
1. POLAR3D –thedefault(network)screen.
2. The printer icon (“Print File”) selects the “Project Details”
screen, where you may upload a file to print, or select an
already available file to print (as the Polar3D printer’s user
interface ships with several test .stl files), and then initi-
ate printing. This screen also displays, on the right hand
side under “Printer Status”, various status information
regarding the printer.