
User's Manual Part 2
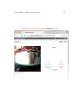
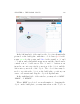
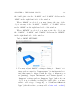
Table Of Contents
- The printer local web interface
- CAD software – create your own objects
- STEAMtrax curriculum
- Operational tips
- Updating the printer
- Printer maintenance
- Troubleshooting
- Appendices
- Polar3D printer specification sheet
- Polar3D printer diagram
- Connecting the printer directly to your device
- Glossary
- Index

CHAPTER 4. THE POLAR CLOUD 175
the build plate via the “X-AXIS”and“Y-AXIS”slidersunder
“MOVE”intherighthandsideofthewindow
When “SCALE” is selected, you may change the size of the
object via any of the “X-AXIS”, “Y-AXIS”, or “Z-AXIS”sliders
under “SCALE”intherighthandsideofthewindow.
When “ROTATE”isselected,youmayrotatetheobjectvia
the “X-AXIS”, “Y-AXIS”, and “Z-AXIS”slidersunder“ROTATE”
in the right hand side of the window.
Under “PRINT SETTINGS”:
1. You may adjust “BASIC”settingsrelatingto:“Basic”set-
tings such as extruder “Temperature”(afundamentalset-
ting that must be aligned with the type of filament you
are printing), “Layer Thickness”, and “Print Speed”; or
“Support”settingssuchas“Support Type”(whereifyour
object is not actually touching the build plate, you may
wish to add a type of support), or “Platform Adhesion
Type”(whichiswhereyoumayaddabrim, raft,orskirt).