
User's Manual Part 2
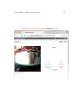
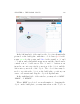
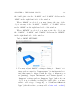
Table Of Contents
- The printer local web interface
- CAD software – create your own objects
- STEAMtrax curriculum
- Operational tips
- Updating the printer
- Printer maintenance
- Troubleshooting
- Appendices
- Polar3D printer specification sheet
- Polar3D printer diagram
- Connecting the printer directly to your device
- Glossary
- Index

CHAPTER 4. THE POLAR CLOUD 174
In t h e left hand side of the window, the object is schematically
pictured on the build plate, with three colored axes (red for the
x-axis, green for the y-axis, and blue for the z-axis), a “+”and
“-”button,andadialwithfourarrowsaroundtheoutsideanda
centr al “restor e” doubl e arrow. The “+”and“-”buttonszoom
in and zoom out, respectively, your view of the object, and the
dial rotates your view of the object. The colored axes may be
used to reposition the object on the build plate: position your
cursor over an axis and drag the object along that axis.
In th e right ha n d side of the window, you may select “MOVE”,
“SCALE”, or “ROTATE”.
When “MOVE”isselected,asanalternativetodraggingthe
object on the build plate, you may instead move the object on