
User's Manual Part 2
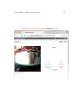
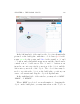
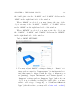
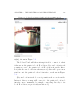
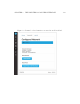
Table Of Contents
- The printer local web interface
- CAD software – create your own objects
- STEAMtrax curriculum
- Operational tips
- Updating the printer
- Printer maintenance
- Troubleshooting
- Appendices
- Polar3D printer specification sheet
- Polar3D printer diagram
- Connecting the printer directly to your device
- Glossary
- Index
CHAPTER 4. THE POLAR CLOUD 173
Click i ng on the icon for an object itself will take you to a
screen where (for one of your private objects) you may “3D
PRINT”, “DOWNLOAD”, or “SHARE”yourobject,or“EDIT”the
object’s text description; see Figure 4.10.Forsharedobjects,
you have similar choices “3D PRINT”, “DOWNLOAD”, or “SHARE”
(with “EDIT”theobjecttextdescriptionnotavailableforshared
objects).
For any ob ject, you may also “LIKE”theobjectbyclick-
ing on the heart icon (towards the upper right of the object
screen).
Click i ng on “3D PRINT”takesyoutoascreenwhereyoumay
adjust “PLACEMENT”(positiononthebuildplate)and“PRINT
SETTINGS”, or click the “PRINT” button when you are ready to
print; see Figure 4.78.
Under “PLACEMENT”, you may “MOVE”, “SCALE”, and “ROTATE”
the object: