
User's Manual Part 2
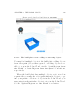
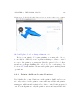
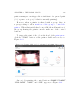
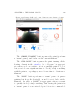
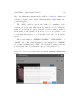
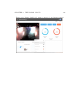
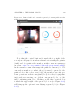
Table Of Contents
- The printer local web interface
- CAD software – create your own objects
- STEAMtrax curriculum
- Operational tips
- Updating the printer
- Printer maintenance
- Troubleshooting
- Appendices
- Polar3D printer specification sheet
- Polar3D printer diagram
- Connecting the printer directly to your device
- Glossary
- Index
CHAPTER 4. THE POLAR CLOUD 141
4.6.2 Submit your print job to a printer and begin
printing
From the build plate screen, clicking the blue “PRINT” button
(at the upper right of the screen) submits your print job to
the currently selected printer (as shown in the upper left of the
build plate screen); see for instance Fi g u r e 4.81 (or for additi o n al
discussion of buil d plate screen features, refer to Figu r e 4.78 in
Section 4.6.1).
Especially if your object( s) have large .stl files,youmay
see a swirling blue i con (with a numeric progress value) towards
the lower left of the build plate screen after clicking “PRINT”,
as the job is submitted to the printer; the numeric value and
inner blue arc indicate how far the load has progressed, while
the swirl of the outer blue arc shows progress occurring; see
Figure 4.82.
Once your job is completely submitted, you will automati-
cally be taken to the printer dashboard screen, where you will
now see your job (as well as possibly other, previously submit-
ted, jobs) in the print queue; refer to Figur e 4.86.
To actually begin the print of your ob ject, or whichever ob ject
is first in the queue, the printer owner or a printer manager (or
a member of a group with control access to the printer)must
click the “START”buttonontheprinterdashboardscreen(a
blue button, towards the upper right); Section 4.6.3 wi l l further
discuss the printer dashboard control buttons such as “START”
and “STOP”. Of course, first you may want or need to perform
some p r ep arat i on tasks such as: remove any previously printed
completed object o↵ the build plate, touch-up the hair spray on