
User's Manual Part 2
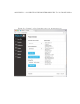
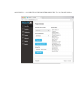
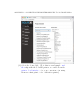
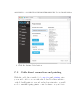
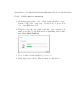
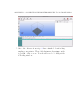
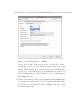
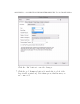
Table Of Contents
- The printer local web interface
- CAD software – create your own objects
- STEAMtrax curriculum
- Operational tips
- Updating the printer
- Printer maintenance
- Troubleshooting
- Appendices
- Polar3D printer specification sheet
- Polar3D printer diagram
- Connecting the printer directly to your device
- Glossary
- Index
APPENDIX C. CONNECTING THE PRINTER DIRECTLY TO YOUR DEVICE250
C.1.2 Wireless direct printing
The steps below describe the full process for uploading an d
printing an arbitrary .stl file. (However, note that t h e Po-
lar3D printer ships with several .stl files,suitableforaninitial
test of the printer, already onboard t h e pr i nter user interface; f or
your very first print, you may wish to print one of them rather
than uploading your own file.)
1. On the printer’s user interface, click the Print File button
(top choice in the column on the lefthand side of the wi n -
dow). This will take you to the Project Details screen,
as shown in Figure C.2.
2. Upl o ad a file to print. ( If this is your very first print on
this printer, you may prefer to skip this step, of finding and
uploading an arbitrary .stl file,andinsteadgotostep3
to print one of the files shipped as test print files.)
(a) Unde r Upload File,selectChoose File.
(b) Fin d the file, select the file, and click Open.
(c) Click the Upload File button.
3. Sel ec t and print the file.
(a) Click the Select file... drop down menu under
Print File (.stl or .gcode).