
User's Manual Part 2
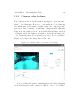

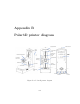
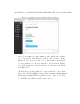
Table Of Contents
- The printer local web interface
- CAD software – create your own objects
- STEAMtrax curriculum
- Operational tips
- Updating the printer
- Printer maintenance
- Troubleshooting
- Appendices
- Polar3D printer specification sheet
- Polar3D printer diagram
- Connecting the printer directly to your device
- Glossary
- Index

APPENDIX C. CONNECTING THE PRINTER DIRECTLY TO YOUR DEVICE247
surface by appl yi n g a coat of hair spray (see above ), and
raised the print head to make room for installing th e build
plate, you are ready to install the build plate on the printer
build plate shuttle.
The bottom center of the build plate has a gear affixed.
Place the build plate so that the center of t he gear seats
over the bearing on the build plate shuttle, and the gear
teeth engage with the geared axle of the pr i nter build plate
shut t le.
3. Inser t the power cord into the adapter, and i n ser t the adapter
plug into your Polar3D printer. Do not force the adapter
plug; it will not be flush with the printer.
4. Plu g in to a power outlet; the Polar3D printer’s LED lights
should turn blue over blue: POLAR3D .
Then t her e are two ways to connect the printer direct l y to
your device: wireless (WiFi) – see Section C.1, or v i a direct USB
cable – see Section C.2.
C.1 Wireless direct connection and printing
For wireless (WiFi) di re ct connection and printing,youwilluse
the printer’s own hotspot and the printer’s user interface to com-
municate directly with the printer from your device (computer,
tablet, phone), and will be able to print object files stored on
your device.