
User's Manual Part 2

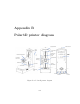
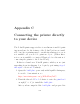
Table Of Contents
- The printer local web interface
- CAD software – create your own objects
- STEAMtrax curriculum
- Operational tips
- Updating the printer
- Printer maintenance
- Troubleshooting
- Appendices
- Polar3D printer specification sheet
- Polar3D printer diagram
- Connecting the printer directly to your device
- Glossary
- Index
CHAPTER 11. TROUBLESHOOTING 240
(see Figure 2.1), and consider cleaning the filament drive
gear, (see Section 11.2).
4. If st r i ngs of unintended extrusion are occu r r i ng between
separate parts of your print, then either the temperature
may be a bit too high – try decreasing the temperature
by 5°Candtryagain–orelseyoumayhaveabatchof
filament that is simply rather runny even at lower tem-
peratures – try increasing the retraction afewmillimeters
(3 or 4 millimeters). For adjusting the retraction if pr i nt-
ing through the Polar Cloud, under ““PRINT SETTINGS”,
“ADVANCED”, “Retraction”, adjust the “Amount”(andper-
haps the “Speed”oftheretraction).
5. If cor n er s a re messy or blurry or (unintentionally) rounded
rather than sha rp , or if th er e are ripple patterns (corner
ringing)visibleonverticalsurfacesneardirectionchanges
(corners), the print speed may need to be slowed down. To
slow down the entire print, if printing through the Polar
Cloud, under “PRINT SETTINGS”, “BASIC”, adjust “Print
Speed”.
6. If surfaces have blemishes where the interior print mate-
rial shows through or penetrates (telegraphing), the exte-
rior shell of material may b e too thin: modify the print
to have a thicker exterior (u s e more shells). In partic-
ular, if printing through the Polar Cloud, under “PRINT
SETTINGS”,“ADVANCED”, “Quality”, adjust as relevant the
“Wall Thickness”, “Bottom Layer Thickness”, and/or
“Top Layer Count”.
7. If tall and narrow sections of the print look squish ed or
melted, the print may be happening so fast, with one layer