
User's Manual Part 1
CHAPTER 2. START PRINTING 41
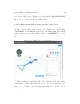
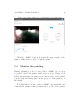
image, and three tabs will appear in the right window under
“PLACEMENT”: “MOVE (W)”, “SCALE (E)”, and “ROTATE (R)”.
Click on “SCALE”(ortype“E”) to select it (when selected, it
will show as blue); see Figure 2.12.
You may choose to scale the ob ject’s overall size uniformly
along all axes, or scale the object di↵erently along di↵erent
axes: see the “Scale of axes uniformly”checkboxbelowthe
“SCALE”tab. Toadjusttheobject’ssize,youmayeithermove
the slider position on an axis in the right-hand window, or you
may click on an axis in the left-hand, object view window, and
then drag to change the size along that axis as desired.
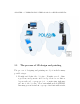
2.2.2.3 Experiment with rotating your view of the object
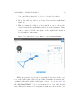
At the object build plate screen, see Figure 2.9,thedialtowards
the upper left of the left-hand (object on build plate) screen in
e↵ect “rotates the build plate” – it rotates your view of the
object. The two small buttons underneath the dial allow you
to zoom in and zoom out on your view of the object and build
plate.
(Note that this rotation of your view of the build plate and
the object on it is distinct from rotating the object’s placement
on the build plate – that operation, rotating the placement of
the object while keeping the build plate stationary, is instead
controlled via the “ROTATE (R)”tabunder“PLACEMENT”.)
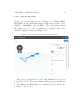
Try click i n g on the left arrow and right arrow on the dial to
rotate the build plate (and the object on it), and try clicking on
the left button below the dial (to zoom in) and the right button
below the dial (to zoom out).