
User's Manual Part 1


CHAPTER 1. GET CONNECTED TO THE POLAR CLOUD 24
add your 3D printer’s MAC address to the li s t of hardware on the
network – similarly to how they would add a laser printer.
Make a note of the MAC address of your printer, as your
network administrator will likely need it! The MAC address is
printed on the backside of the “GETTING STARTED”sheetshipped
with your Polar3D printer. The MAC address may also be found
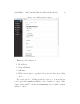
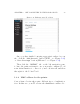
displayed by the printer local web interface: after connecting to
192.168.0.1,lookundertheheader“Network Information”
for the value in t h e “Current MAC” fi el d ; see for instance Figure
1.8.(Indeed,theprinterlocalwebinterfaceshowstheMAC
address in multiple places; see also for example Figure 1.20 or
Figure 1.21.)
Note that if you have left your Polar3D print er configured to
potentially use multiple WiFi networks, then the MAC address
displayed may di↵er in its final digit from the value printed on
the “GETTING STARTED”sheet.
1.3.3 Open HTTP ports
Outgoing HTTP ports 80 and 443 must be open to t h e printer.
If your local network does not allow the print er to access those
outgoing ports, then the printer’s attempts to connect to the
Polar Cloud will not fully succeed.
In terms of LED lights, the symp t om you will see when the
rest of configuration was successful but now the printer can’t
access the outgoing HTTP ports is that the LED li g hts will be
blue over yellow: POLAR3D .
Make a note of your printer’s IP address (if you are using a