
User's Manual Part 1

CHAPTER 1. GET CONNECTED TO THE POLAR CLOUD 21
In order for your 3D printer to successfull y connect to the
Polar Cloud, ou t g oi n g HTTP ports 80 and 443 must be ope n to
your printer. If your local netwo rk d oes not allow th e pr i nter
to access those outgoing ports, then the printer’s attempts to
connect to th e Polar Cl o u d will not fully succeed. In this case,
you will need your IT or network administrator to allow your
printer to access those outgoing ports; see Section 1.3.3.
For a general overview of network connectivity diagnosis and
solutions, see Section 1.3.4.
1.3.1 Static IP address for printer
Many networks automatically a ssi g n IP addresses (via DHCP)
to network devices such as your 3D printer, but if your local net-
work does not have a DHCP server, then you will need to man-
ually configure your printer with a static IP address. If your lo-
cal n etwork requires a static IP address, then after con n ect in g to
192.168.0.1 (and if necessary clicking the “NETWORK”tabtoget
to a screen such as Figure 1.4), either click on “ Add WiFi”and
then select a WiFi network name from the drop down menu (if
you are configuring a WiFi connection ) , or cli ck on “Ethernet”
(if you are configu r i n g an Et h er n et connection).
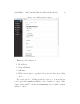
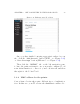
Instead of leaving the “DHCP” button highlighted, click the
“Static Address”button. Thiswillbringupadisplaysuchas
shown in Figure 1.20 ( Wi Fi ) or Figure 1.21 (Ethernet).