
User's Manual Part 1


CHAPTER 1. GET CONNECTED TO THE POLAR CLOUD 20
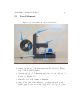
Perform steps 1 throu gh 4 from Section 1.1.
But instead of steps 5 through 8 from Section 1.1,simplyplug
in the Eth er n et cable to both th e printer, and to an Ethernet
jack for your local network. If the POLAR3D LED lights on
the printer become blue over white, it indicates that your printer
has successfully connected to the Polar Cloud!
However, if the printer could not successfully connect to the
Polar Cloud, see Section 1.3:youmayneedtoenterastatic IP
address fo r your printer, or ask you r IT or network administrator
to open up local network access to your printer.
Once the LED lights on the printer show as POLAR3D (blue
over white), then perform steps 9 and 10 from Section 1.1;that
is, log in to your Polar Cloud account, and add the printer to
your Polar Cloud account.
1.3 Network issue s and solutions
Note that captive port al network access is not supported.
If your site does not use DHCP and instead assigns static
IP addresses to network devices (such as yo u r 3D printer), you
will need to configure your 3D printer to know its static IP
information; see Section 1.3.1.
If your site uses advanced networking requirin g authentica-
tion of a MAC address, then your IT or network administrator
will need to add your 3D printer’s MAC address to the list of
hardware on the network in order for your printer to successfully
connect to the local network; see Section 1.3.2.