
User's Manual Part 1

CHAPTER 4. THE P OL AR CLOUD 139
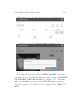
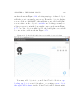
8. Once an object has been selected by clicking on it (in the list
on the right, under “PLACEMENT”and“PRINT SETTINGS”),
the “PRINT SETTINGS” tab also becomes active. Under
“PRINT SETTINGS”aremanysettings,(correspondingto
slicer setti ngs) which may be used to adjust aspects of the
print, such as the temperature, speed of printing, thickness
of exterior walls on the object, whether to add a brim, raft,
or skirt, etc.; see Figure 4.80.
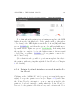
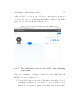
In particular, under “PRINT SETTINGS”, there are three
screens of settings:
(a) The “BASIC”settingsincludeextrudertemperature(185°C
is normal for the PLA filament provided by Polar 3D,
but the temperature should always be adjusted for the
type of filament you are actually using), and whether
to add a brim, raft,orskirt when printing the object.
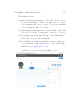
(b) The “ADVANCED”settingsincludeinfill settings (den-
sity of the object’ s interior), filament diameter, retrac-
tion settings (raising the print head dur i n g non-printing
moves), “Quality” settings (adjusting the thickness
of the exterior of the object), “Speed”settings(e.g.,
for fine-tunin g the speed of printing the initial layer –
which may be relevant for gett i n g good adhesion, and
agoodinitialflowofmaterial),andsomecoolingset-
tings.
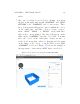
(c) The “G-CODE”settingsallowyoutomodifythestarting
and ending Gcode (actual instructions to the printer).
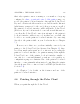
9. The “UI SETTINGS”areseveralsettingadjustingtheoper-
ation of the b u i l d plate user interface; see Figure 4.81.