
User's Manual Part 1


CHAPTER 4. THE P OL AR CLOUD 136
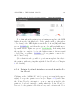
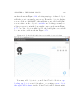
2. Towards the upper right is the “PRINT”button;pressthat
button when your object is ready, and you wish to submit
it for printing. Note th at when you p r ess “PRINT”, you
will see a swirling loading icon towards the lower left of
the screen as your job (with its underlying .stl files)is
submitted to the printer , and then you will automatically
go to the printer dashboard screen; see Section 4.6.5.
3. The object or objects are shown positioned on the build
plate, towards the middle-left of the screen.
4. Adialforrotatingyourviewoftheobjectandbuildplate
(and a central double-down-arrow for restoring the object
to flat on the build plate), and “+”and“-”buttonsfor
zooming the view in or out, i s available on the left, above
the view of the object itself.
5. On the right, underneath “PLACEMENT”,“PRINT SETTINGS”,
and “UI SETTINGS”, is a list of one or more objects. Click
on an object to activate the “PLACEMENT”and“PRINT SETTINGS”
for that object.
When there is only one objec t on the build plate, the “PLACEMENT”
and “PRINT SETTINGS”applytothatobject,andtheob-
ject need not be explicitly selected (clicked on). However,
when ther e is more than one object, clicking on the object
in the list selects which object will have “PLACEMENT”and
“PRINT SETTINGS”adjustmentsapplied.
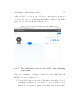
6. When “PLACEMENT” is highlighted, four buttons appear un-
derneath it, above the list of objects.