
User Guide


FlashDLPrint.exe
FlashDLPrint
17
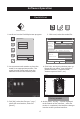
Software Operation
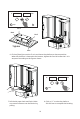
1. Install and run the FlashDlprint.exe program.
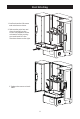
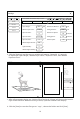
3. Use movement and rotation to place the
model in an appropriate position. The
model should not be lower than the
network surface of the bottom plate.
4. Click Print, and a print window pops up.
(Generally just adjust "layer thickness",
"bottom number", "exposure time",
"bottom exposure time", etc.)
2. Click Load, select the model file.
Load
View
Set Position
X:
Y:
Z:
0.00mm
0.00mm
0.00mm
On Platform Separately
On Platform Center
Reset
Move
Rotate
Scale
Cut
PrintSupports
Print
I want to:
Material Type: Grey Standard
Layer Height:
More Options >>
Base Time: 5.5s
80.0s
12
Attach Time:
Gradual Time Layers:
Restore Defaults
OK Cancel Save Configuration
RaftExposure Time
Infill OthersSize Adjust
0.1mm
Save As New Remove
Operation:
Preview
Print When Slice Done
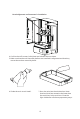
5. Click [OK], select the file type ".svgx ",
select the save location, and click
[Save S].
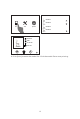
6. At this point, "Slicing..." will be displayed
at the bottom of the interface. , after the
section is completed, the interface changes
into the section preview interface.
Slicing model ...
FlashDLPrint
FlashDLPrint
File(F)
View
Move
Rotate
Scale
Cut
Load Supports Print
Edit(E) Print(P) View(V) Help(H)
X
Z
Y