Content Preface Notice Terms Chapter 1: About Adventurer 3 Lite 11 Components Introduce 12 Reference Chapter 2: Operating 2.1 Unpacking 2.2 Accessorize 2.3 Interface 23.1 Build 2.32 Tools 23.21 Net Work 2322 Preheat 2323 Setting -2324 About -2.33 Filament -2.4 Print 241 Load Filament 24.2 Modal File Transfer 24.3 Print 2431 Flash Cloud Print 2432 Polar Cloud Print -24.4 Model Remove 245 Replace Filament -2.45.
Preface Note: Each device must be tested before leaving Factory. If there are some residues in extrude or some tiny scratches on the build tape, it is normal and won't affect the printing quality. On the completion of this User Guide, thanks all Flash Forge engineers and the Flash Forge 3D printer users for their unremitting efforts and sincere assistance.
Notice Safety Notice: PLEASE READ AND STRICTLY FOLLOW ALL THE SAFETY WARNINGS AND NOTICE BELOW. ‘Work Environment Safety # Keep your work place tidy. 4 Do not operate Adventurer 3 Lite in the presence of flammable liquids, gases or dust. ® Keep Adventurer 3 Lite out of children and untrained people’s reach. [ETT © Always use the Adventurer 3 Lite with a properly grandaunt outlet Do not raft Adventurer 3 Lite plug. 4 Contuse Adventurer 3 Leta in damp or wet locations.
© The computer connects ta the device via WIFI to download the printed model. Connect tithe cloud platform through wife, you can check the printing status, transfer the printing documents and control the printer. Environment Requirements © Temperature: Moisture: Place Requirements # The device must be placed in a dry and ventilated environment. The distances of the left, right and back side space should be at least 20cm, and the distance of the front side space should be at least 35cm.
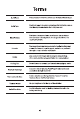
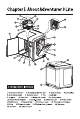
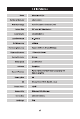
Terms Bulls Plate The surface on which the Adventurer 3 Lite builds an object. Build Tape The black tape that covers Adventurer 3 Leta's build plate so that the object can stick to the build plate well. Build Volume The three dimensional amount of space that an abject will use once iris completed. The largest build volume i8150"150"150mm. The integral extrude device Installed on X-Axis. Extrude Extrude draws the filament from tha spool, melts it and pushes it through a nozzle into the build plate.
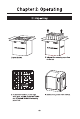
Chapter 2: Operating 2. Take out the wrapping paper box on the top. careful Filament, build tape, 4.Take out the printer from the box. solid glue, scraper and power cable are all placed inside the wrapping paper box.
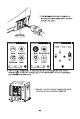
5. Plug the power cable into the Input on the back and turn on the power switch, the touch screen Is turned X:2000 Y:4500 Z:3600 ; © 4 Status Language Calibration Homes 6. Click [tools] [setting] in turn to enter page like this, turn to page two, click [move]. Click the upper arrow in the moving page to make the extrude raises for removing the paper box on tha bottom easier. 7.0pen the front door, take out the paper box inside the printer, printer unpacking completed.
Interface Menus In & Filament = 6.62GB ® Not Available ¢® No job © 1.Tap [Print]. Ship-PLAGUE ® ® 20mm Bookplate CTF DO O Select all CTE OE 3.File list Read tha print fail from: The local memory card Tha USB stick The Cloud Back: Back to upper interface 2.Choose the read path of the print file File list. Tap ® to begin printing; tap the picture of the selected filch to enter file details. Page-flip: Tap the left/right arrow.
@® 0h10min 0.7m 20mm Box PLAGUE Time Remaining © Oe EEN 0JO10) Fla details: Including file picture, time beaded, filament beaded. Build: Ta begin printing the file. Copy: To copy the files to the local memory card from the USB stick. Elate: To delete the print file, Print interface Cancel: To cancel the print job. Presumptuous: To suspend or resume the print job. More: To check more settings and details information during printing.
&B Filament Newark: To connect printer to your PC or internet. 1 Preheat: To preheat the extrude and build plate. © Setting: To implement relevant function setups. @® About: Information about the printer. 2.3.2.1 Network WiFi = ot | O|[w Flash forge WiFi Potshot Choose a network PT-LINK EDUC Cloud Ethernet 123 © 12 she China Net-AnCr [CG] < 3 > [CG] @ ON/OFF: To turn on/off the WIFE tactician. = WiFi connection: To connect your printer with your PC via a stable WIFI signal.
‘Setup Wan potshot = § ssh: WIE Potshot 3 Cloud Theme Cm) HEE set your printer as a ELAN hot spat. & > Turn on/off the ELAN potshot. Potshot setting: To set the potshot name and password. Input potshot name with numbers, characters and symbols. © Tap ta save the name and password. Ethernet Connection WiFi Potshot Ou || Qu Please connect the cable Connected successful Cloud Ethernet connect your printer with your PC via Ethernet cable.
Cloud Connection c= Network Preheat Setting About @® = t=) WiFi Potshot a Cloud Ethernet @® &» Washcloth & Polar cloud ® Flash Cloud oO Printer Nam: Flash forge Registration Code: ABRADE iC} Polar Cloud OO Account PIN: © L Turn an tha WIFI or Ethernet cannelloni, connect the printer to intranet successfully. on the printer; 3.Turn on the Cloud Connection function; 4.
2.3.2.2 Preheat setting Extrude [ @ Network © 2200 (® Platform soc ® © Cen ON/OFF: Turn ON/OFF the extrude or platform preheat; Tap(¥) symbol, you could set preheat temperature; Long press ® O symbol sot preheat temperature rapidly; Extruder/Platform preheat interface Extrude 235/235¢ Extrude 235/2350C —— Platform 7500 ® It contains actual temperature, target temperature and heating progress. Extrude highest preheat temperature: 240°C Platform highest preheat temperature: 100°C Tap : Abort the prater job.
® ® Factory Reset Update CEO Status Status Language Calibration Home CEO Network Preheat Status Language Move Filament Check Setting About Calibration Home Led Buzzer ® ® ® Setting interface 5 FR €A Status ® Language LF, Calibration ~~ 2 HOME Home Move = Filamentous Or Led 55 Update Q Buzzer . Factory Reset GF 20c $ 20¢ & Load X2000 Y:4500 Z 36.00 © A It displays the real-time coordinates of X-axles, Y-axis, Z-axis and the real-time temperature of extrude and platform.
pul 7@ OO Calibration Home DHE Choose the target language. Click the kowtow adjust the nozzle so that it just touches the platform Status Language zaps 0.00 e @® expounder © Calibration Home arrow: Extrude will elevate, away from the platform; {7k Calibration To calibrate the initial distance between extrude rand platform. After homing completed, slide the place of paper continuously back and forth between the nozzle and the build plate.
Move Filamentous Led Buzzer C= »E X2000 Y:4500 Z:3600 ® Move Filament Check Led Buzzer CEO Move Filament Check Led Buzzer CE 19 & Manual: To manually adjust the positions of extrude and build plate. ® Extrude moves tithe right; © Extrude monotheist left; ® Build plate moves tithe front; (@ Buildplatemovestothe back; ® Extrude moves upward; © Extrude moves downward; Filament check: = To turn on/off the filament check, notice will pop out when filament is used up or suspended when the checks turned on.
Factory Siting Completed! Factory Reset Update Delete all data Restored to factory setting interminable memory Factory Setting: Deletes all data In internal memory, return the printer to factory getting. 55 Update: To upgrade the newest firmware. 2.3.2.4 About: Machine Type: Firmware Version: WiFi MAC: Adventurer 3 Lite vig 02:00:00:00:11:66 Serial No: Build Volume: 123456 150x150 150 Register Code: Usage counter: hours Polar Serial No: IP Address: 10.90243.
7 f= 200p3c| | 2357235 0 23525c Load Heating extrude_ Preheat completed. Begin loading. Bros winnow color appears Ls cee ® & Load The extrude [8 heated up to 235°C. « After heat completed, insert the filament into the extrude at an upright angle until some resistance is sensed(as the filament is pushed through the feeding wheel]. Load will complete when you see filament come out of extrude.
Plug the power cable into the Input on the right side and turn on the power switch, the touch screen Is turned on. 2.4. Load Filament 1. Open the filament cover, insert the filament into the filament intake, push filament anti the feeding wheel until some resistance is sanded. Note: Please aka sure filament has been pushed into the feeding wheel, but do not push too much.
&B Filament 5 Load Le Change C) 200 /235¢ 3 Heating extrude. I 235 235°C Preheat completed, Begin loading... 2.Tap [Load] -ho 235 235°C Press ok when new color appears After Load completed --Tap [0K] 3. Load completed wham you see filament cons out of extrude, Tap [0K]. Put the spool of filament on the spool holder, close tha filament cover. Mind the loading direction of filament, make sure to be clockwise as the picture showed.
2.4.2 Model File Transfer After generating the Geode fle, you can transfer [Eto your Adventurer 3 Lite with different network methods. If use USB stick to print, please insert your USB stick with target file to your Adventurer 3 Lite, there will be no need to set new network. Marathon: WIFI Connection 1 Gi {ey Network Preheat WiFi Potshot Setting About Cloud Ethernet C} © 1. Tap [WIFI]; WiFi Choose network © Flash forge Flash forge Choose network China Net An Cr China Net-AnCr Qs 1234 Qs 1234 CED 2.
| Lome ct | IF Kibble tpt) 19F 168. 16 L171 0 BENCH 4. In the pop up dialog box, the connection mode selects WIFI, and fill in the IP port column with the IP address of the printer. Query IP address clicking [tools] [about], turn to next page, you can see the IP address. Input completion and click connect. © 5. When the connection Is succeed, the machine status bar will appear in the lower right corner of the software interface, and the printer icon will be displayed as a connected state.
5. After the software slicing Is completed, click [Print]. Then the printer starts preparatory work such as preheating, and automatically starts printing after it is ready.
IEE EEN OS Build RZ Tools &B Lament = 6.62GB Not Available &@ No job 1.Tap [Build], choose the file SEE name to enter detail page, 20mm Box-P._ @ hominid B 070M 2.Choose the model file, tap ® path: Printer internal memory, USB stick, Cloud. on Its right to start printing; or tap model picture or model tap (5 photostatting. 20mm Box-LAG Build completed! ok 0h 10 min Time Remaining Extrude will heat up automatically, when heating finishes, the printer will start ta build the model.
*Flash forge v “Time Ramming 0h 0 min 2.4.3.2 Polar Cloud Print 1 Register Polar cloud account. to register the account. 2 Query Polar cloud PIN code. POURS, muse con sous Tone wo Se a Morass since 20s hvu is snd song community oid State » nn 108522 s75629 Fi Dee ee : event Corporeality Abject a PORN ED ome cues oop ein mie sp a Sst sho 5 Dinner wld © eon 5 1 +950 R08 prey ss fe o ett. psi ascends Res mi es ee Dat — aE (A).
Location Biography Website URL Email +ADD Mall Pin Code 2). Find the PIN Code column bellwether page, and the shown number is PIN code. 3. Connect the Adventurer 3LitatatheIntemat. Choose the appropriate network connection mode In the communication interface to connect the watermark [sea the 2.3.21 section of the inaction methadone. 4. Connection Adventurer 3 Leta tithe Polar cloud.
comm Printers FORESEE mee cow Click [NY SUBJECT, than click [UPLOAD] ta upload the modal. POLAR oo comm sme die 9 Se, aie Drag and drop the model Ales that need to be uploaded to the box area or click the box area to select the upload model, then click [UPLOAD] ta upload.
POLAR ESS Gn Count due Buck [PRINT]. POLAR fen . Siam ts wn wom he 9.Click [START], the printer starts the cloud task downloading, and starts printing when the download is finished.
2 Model Remove 1. Take out the removable build plate. Hon printing completed, extrude and build plate may still be hot, please start operating after cooling down! 2.Bend the build plate, the plate will produce certain deformation, separating the plate away farm the bottom of modal (Please uss a scraper ta assist removing when modal is too small or big).
2.4.5 Replace Filament 200/235¢ Heating extrude. 2. Pull aut the filament as the picture 3. Insert new filament into the filament intake showed above, and push the filament into the feeding wheel until resistance is sensed. 4 235/235¢| | 235/35¢| | 235p235¢ Unloading the filament, Pullout filament, please eat. food new lament, prosperous. Press when new color appears. 4. When new filament coma out of extrude steadily, replace is complicated, Tap [0K].
2.4.5.1The switching can be controlled through the Cloud 1. Connect to Polar Cloud The user can turn on or turn off the camera through Polar Cloud. Click Toadstool Communication -> Cloud Connect -> Polar Cloud, enter the settings page of Polar Cloud, click the input boxes of account number and PIN, enter the account number and PIN, click the "Start" button ta connect to Polar Cloud. The account number is the mailbox used for sign-up with Polar Claus; for the acquisition of PIN.
Chapter 3: Q&A Q1. How to solve if the nozzle is clogged ? Method 1: Tap [Preheat], heat up the extrude to 240°C, after heating completed, press the air tube Joint and pull out the filament guide tube. Check to see whether the filament is vended or filament tip Is not smooth, cut filament tip smooth and flat, install the guide tube and filament back, Tap [Load]. Method 2: If mat had 1 not improving, use an unclogging pin tool ta unclog filament.
Q3. Do ws need to do extrude calibration again after replacing nozzle? Yas, do extrude calibration again te ensure high print quality as minimal error may be caused by extrude Installation. Q4. How to solve if displayed temperature is abnormal after replacing nozzle? Abnormal temperature indicates extrude sensor can not be read, please check the nozzle whether iris well installed. Q5. How ta solve if na filament coma out of extrude after tap [Build] modal filch and extrude begins moving normally? 1.
Q12. What kinds of file formats doss Adventurer 3 Lite support? Input: 3mf / stl / obj /fpp / bmp / png / jpg / JPEG files. Output: gx/g files. Q13. Does Adventurer 3 Leta support either cloud platform besides the Flash Cloud? Yes, Adventurer 3 Lite Interface is open up to all other cloud platforms. Ql4. Is the ABS printing safe? ABS filament will give off certain poisonous gas when heated up, please put the printer in well ventilated condition when printing ABS.
Daily Maintenance Instruction: Please apply lubricate grease ta printer guide rods if you do not use It for long,or doth same maintenance once a month. Chapter 4: Supports and Service Flash Forge team is on standby and ready to help you with any challenges you may have with your Adventurer 3 Lite. If the issues or questions are not covered in this User Glued, you can seek for solutions on our official website or contact us via telephone.
FCC Statement Any Changes or modifications not expressly approved by the party responsible for compliance could cold the user's authority to operate the equipment. This device complies with part 15 of the FCC Rules. Operation is subject to the following two conditions: (1) This device may nat cause harmful interference, and (2) This device must accept any interference received, including interference that may cause undesired operation.
EEE 5 Official Website [EE Zhejiang Flash forge 3D Technology Co., Ltd. Tol: +36 579 02273989 Add: 2/F, No.