IP Indoor Monitor Quick Start Guide V1.0.
Foreword General This document mainly introduces structure, installation process, and basic configuration of the IP Indoor Monitor (hereinafter referred to as the "indoor monitor"). Safety Instructions The following categorized signal words with defined meaning might appear in the manual. Signal Words CAUTION Meaning Indicates a potential risk which, if not avoided, could result in property damage, data loss, lower performance, or unpredictable result.
Regulatory Information European Directives Compliance This product complies with the applicable CE marking directives and standards: Low Voltage (LVD) Directive 2014/35/EU. Electromagnetic Compatibility (EMC) Directive 2014/30/EU. Restrictions of Hazardous Substances (RoHS) Directive 2011/65/EU and its amending Directive (EU) 2015/863. A copy of the original declaration of conformity may be obtained from Dahua Technology.
connected. Consult the dealer or an experienced radio/TV technician for help. FCC RF Radiation Exposure Statement: This equipment complies with FCC radiation exposure limits set forth for an uncontrolled environment. This equipment should be installed and operated with a minimum distance of 20cm between the radiator and any part of your body. FCC SDOC Statement can be downloaded from: https://us.dahuasecurity.
Important Safeguards and Warnings The following description is the correct application method of the device. Read the manual carefully before use, in order to prevent danger and property loss. Strictly conform to the manual during application and keep it properly after reading. Operating Requirement Do not place and install the device in an area exposed to direct sunlight or near heat generating device. Do not install the device in a humid, dusty or fuliginous area.
Table of Contents Foreword .................................................................................................................................................... I Important Safeguards and Warnings .................................................................................................... IV 1 Introduction............................................................................................................................................ 1 1.1 Overview ..........................
1 Introduction 1.1 Overview The IP indoor monitor, widely used in intelligent buildings, integrates functions of monitoring, voice communication, and unlock. Technologies like embedded technology, IP communication methods, simple network management protocol (SNMP), network encryption, and more are applied to make the whole system more stable, safer, and easier to be managed. 1.2 Features Wi-Fi: Provides wireless network for devices.
1.
1.
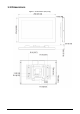
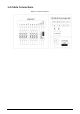
2 Installation Figure 2-1 Installation Table 2-1 Components No.
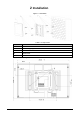
Table 2-2 Description of screw hole distances and diameters No. Description 1 Indoor monitor dimension 2 Bracket screw hole diameter 3 Bracket oval hole position 4 Screw hole distance Step 1 Step 2 Step 3 Step 4 Drill four screw holes in the wall according to holes on the bracket. Put anchor bolts into the screw holes. Fix the indoor monitor on the wall with screws. Connect cables (power cable, network cables, and more). The installation is completed.
3 Configuration You need to configure IP, Wi-Fi, door station parameter, SIP server, and more on the indoor monitor, and then the indoor monitor can communicate with door stations and the management center. 3.1 Configuration Overview Step 1 Plan the location for the SIP server and plan IP and numbers for each door stations and indoor monitors. Step 2 Make sure that the there is no short circuit and open circuit. Step 3 Configure parameters for door stations. Step 4 Add indoor monitors to the SIP server.
Figure 3-1 Main menu Room No. Room No. is displayed at the upper left corner of the main menu. Time and Date On the main menu, time and date is displayed. Arm Mode/Disarm Mode Shortcut icons to arm or disarm are displayed here. The four icons represent at home mode, away from home mode, sleep mode, and customizable mode. Select Arm Mode or Disarm Mode first, and then tap the icons to arm or disarm.
and then you can do do-not-disturb settings. For details, see DND by tapping . Turn off Screen Tap the icon, and then the screen will be turned off. User Settings Tap , and then the user setting interface is displayed. You can select ringtones for different outdoor stations, Do Not Disturb period, call forward mode (there are three options: Always, Busy, and No Answer), and other settings. Ring On this interface, you can select ringtones for different outdoor stations.
Calendar You can view date through the indoor monitor, and create notes, schedules, and plans. Gallery You can view images captured by outdoor stations (VTO) or IP cameras. 3.2.2 Network Settings Step 1 Tap the Settings interface. The settings interface is displayed. Figure 3-2 Setting Step 2 Configure parameters. Table 3-1 Parameter description Parameter Description You can choose to enable Wi-Fi or not by tap Network & Internet . Tap , and then available Wi-Fi network will be displayed.
Parameter Description Storage Spaces used and spaces left can be viewed. You can delete unwanted files as needed. System Languages & Input Languages: You can select languages as needed. Keyboard & Inputs: There are two options: virtual keyboard and physical keyboard. Input assistance: You can use spell checker, autofill service (not available at present), personal dictionary, and text-to-speech output as needed. Pointer speed can also be adjusted. Backup You can use backup storage as needed.
Figure 3-3 Project settings VTH Config Room No.: No. of the room where the indoor monitor is installed. Device Type: There are two options: Master and Extension. Master: If the indoor monitor you are operating works as the master station, you need to select Master. Extension: If the indoor monitor works as an extension, you need to select Extension. Master IP: When the indoor monitor works as an extension, you need to enter IP address of the master station.
Figure 3-4 SIP server (1) Table 3-2 SIP server description Parameter Description Server IP Network Port User Name Password Domain Login Name Login Pwd Status When the platform works as SIP server, server IP is IP address of the management platform. When an outdoor station works as SIP server, server IP is IP address of the outdoor station. When the platform works as SIP server, network port is 5080. When VTO works as SIP server, network port is 5060. Use default value.
Figure 3-5 Outdoor station (VTO) configuration Step 2 Tap an outdoor station (VTO). The VTO IP interface is displayed. Figure 3-6 VTO IP Step 3 Tap the default IP, and then the on-screen keyboard appears. Step 4 Enter the outdoor station (VTO) IP that you planned. Step 5 Tap OK to save the configuration. You can add 20 outdoor stations (one main outdoor station and 19 sub outdoor stations) to the indoor monitor.
Search Device Tap the Search Device icon, and then the system starts to search devices automatically. Reset MSG You can change the email address that you use to reset your passowrd. You need to enable the Resst Password first if you want to reset the password. Security Settings You need to enable the trusted list, and then trusted devices can be added. You can also use Dshell to provide you with the ability to develop custom analysis modules which help you understand events of cyber intrusion. 3.
: Tap the icon to go to the previous page. : Tap the icon to go to the main menu. : Tap the icon, and all thumbnails of interfaces you have opened will be displayed. Select an interface and slide it to the left or right to close the interface. : Tap the icon to turn up the volume. 3.3.2 Checking Messages Tap , and then text messages and videos left by visitors, or public notices released by the management center will be displayed. 3.3.
Appendix 1 Cybersecurity Recommendations Cybersecurity is more than just a buzzword: it’s something that pertains to every device that is connected to the internet. IP video surveillance is not immune to cyber risks, but taking basic steps toward protecting and strengthening networks and networked appliances will make them less susceptible to attacks. Below are some tips and recommendations on how to create a more secured security system.
6. 7. 8. 9. 10. 11. 12. 13. 14. between 1024~65535, reducing the risk of outsiders being able to guess which ports you are using. Enable HTTPS We suggest you to enable HTTPS, so that you visit web service through a secure communication channel. Enable Whitelist We suggest you to enable whitelist function to prevent everyone, except those with specified IP addresses, from accessing the system.
so as to achieve the network isolation effect. Establish the 802.1x access authentication system to reduce the risk of unauthorized access to private networks.