
Quick Start Guide


10
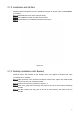
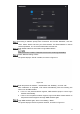
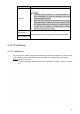
Figure 2-6
Select system type as “TCP/IP”.
Click “OK” to save the settings.
Reboot the device manually, or wait for auto reboot and put the settings into effect.
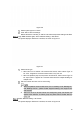
Login WEB interface again; select “Network Setting > SIP Server”.
The system displays “SIP Server” interface, as shown in Figure 2-7.
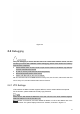
Figure 2-7
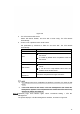
Select server type.
When this VTO or another VTO works as SIP server, select “Server Type” to
be “VTO”. It applies to a scenario where there is only one unit.
When the platform (Express/DSS) works as SIP server, select “Server Type” to
be “Express/DSS”. It applies to a scenario where there are multiple buildings or
multiple units.
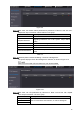
Set VTO number and click “OK” to save config.
⚫ When the platform works as SIP server, if it is necessary to set “Building No.”
and “Building Unit No.”, please enable “Support Building” and “Support Unit”
and set them.
⚫ After VTO is set to be SIP server and configured, group call function will
appear at the interface. To realize group call, please select “Enable” after the
group call.
Select “Network Setting > SIP Server”.
The system displays “SIP Server” interface, as shown in Figure 2-8.