Dahua Video Conference Terminal User’s Manual Dahua Video Conference Terminal User’s Manual Version 1.0.0 Dahua Technology Co.
Dahua Video Conference Terminal User’s Manual Welcome Thank you for purchasing our video conference terminal! This quick start guide is designed to be a reference tool for your system. Please read the following safeguard and warnings carefully before you use this series product! Please keep this user’s manual well for future reference! Important Safeguards and Warnings 1.Attention Please modify the user’s default password after the device operates in case of being stolen.
Dahua Video Conference Terminal User’s Manual Table of Contents 1 Product Overview ....................................................................................................................... 1 1.1 Brief Introduction .......................................................................................................... 1 1.2 Features ......................................................................................................................... 1 1.3 Structure Figure ..........
Dahua Video Conference Terminal User’s Manual 5.4 Video ............................................................................................................................ 14 5.4.1 Image Parameter ................................................................................................. 14 5.4.2 Encode .................................................................................................................. 16 5.5 6 Meeting .........................................................
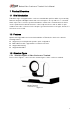
Dahua Video Conference Terminal User’s Manual 1 Product Overview 1.1 Brief Introduction TS51A0 is a type of integrated video conference terminal with small size which is presented by Dahua; it integrates HD digital camera and stereo microphone.
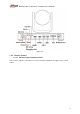
Dahua Video Conference Terminal User’s Manual Figure 1-2 1.3.2 Remote Control 1.3.2.1 Structure Figure of Remote Control Please refer to Figure 1-3 and Sheet 1-1 for the structure and button description of the remote control.
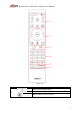
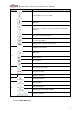
Dahua Video Conference Terminal User’s Manual Figure 1-3 SN Name Description Used to turn on/off the device. 1 Indicator light Option button for remote camera.
Dahua Video Conference Terminal User’s Manual SN Name Description Volume button for voice output Mic mute Zoom in or out, which can be checked via local preview interface. Remote/local camera switch. One button to send demo after the device is correctly connected to laptop. Switch button for local screen layout. UDLR direction button. OK button 2 Menu button. Home button. Return button. Call or have a meeting. 3 Hang up meeting.
Dahua Video Conference Terminal User’s Manual The TV power button , signal source switch button and TV volume adjust button can work normally after they are matched. Take TV power button matching for example, the operation steps are as follows: Step 1 Press button till the red indicator light is on and then release the button. Step 2 Press button, the red indicator light flashes. Step 3 Match the device remote control with TV remote control; please keep the distance between 1 and 3cm.
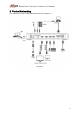
Dahua Video Conference Terminal User’s Manual 2 Product Networking The networking of video conference terminal is shown in Figure 2-1.
Dahua Video Conference Terminal User’s Manual 3 Product Installation 3.1 Packing List Please check the stuff according to sheet 3-1 before installation. SN Name Figure Quantity Description 1 Terminal TS51A0 1 - 2 L-shaped bracket 1 Used for wall mount and pendant of the device. 3 Remote control 1 - 4 Battery 4 Used to provide power for remote control. 5 Power adapter 1 Used to connect to power.
Dahua Video Conference Terminal User’s Manual Users can select hang mount if the thickness of monitor is ≤170mm, hang the video terminal device on the monitor. Please refer to Figure 3-1 for the exact installation steps. Figure 3-1 3.2.2 Wall Mount Users can select wall mount mode if the monitor thickness is more than 170mm or it needs to be installed on the wall. Please refer to Figure 3-2 for the exact installation steps.
Dahua Video Conference Terminal User’s Manual Figure 3-2 3.2.3 Pendant Users can select pedant if the monitor fails to be installed via hang mount or wall mount. Please refer to Figure 3-3 for the exact installation steps.
Dahua Video Conference Terminal User’s Manual Figure 3-3 10
Dahua Video Conference Terminal User’s Manual 4 Login 4.1 Explanation before Login Please make sure the device cable is correctly connected and turn on the monitor. Video terminal device supports three kinds of control operation which are remote control, keyboard and mouse, take the control operation of remote control as an example. Press After the device is powered on, please press button to turn on/off the device. to switch the HDMI output channel of monitor to implement meeting operation.
Dahua Video Conference Terminal User’s Manual 5 System Operation 5.1 General It is to set meeting config. Step 1 Select “Settings> General”. The system displays “Meeting Config” interface, which is shown in Figure 5-1. Figure 5-1 Step 2 Select “Auto Join” It will auto join meeting for the first time, but it won’t join meeting automatically or be invited if users exit actively during the meeting. Note: It will show the inquiry box before joining meeting every time if it is not checked.
Dahua Video Conference Terminal User’s Manual Figure 5-2 Step 2 Configure the interface parameter; please refer to sheet 5-1 for more details about the parameters description. Parameter Note Static It needs to set IP address/Subnet mask/default gateway manually. DHCP It is to search IP address automatically, at this moment, IP/subnet mask/default gateway can’t be set. Sheet 5-1 Mode Step 3 Select “OK”. Step 4 Complete network setting. 5.
Dahua Video Conference Terminal User’s Manual Figure 5-3 Step 2 Configure interface parameter; please refer to Sheet 5-2 for more details about parameter description. Parameter Note Echo Cancellation It is to enable or disable echo cancellation, it is enable by default. It is to adjust level to eliminate echo. Note: Echo Delay The echo delay box will be hidden if it disables echo cancellation. Enable the function to realize self-check of local audio input. Loop Back TV output and speaker output.
Dahua Video Conference Terminal User’s Manual Figure 5-4 Step 2 It is to set interface parameter, please refer to sheet 5-3 for more details about the parameter description. Parameter Note Brightness Contrast Saturation It is used to adjust image chroma and show image hue and saturation. The value range is 0~100, and it is 50 by default. It is used to adjust the image contrast. It is 50 by default.
Dahua Video Conference Terminal User’s Manual 5.4.2 Encode Step 1 Select “Settings > Video > Encode”. The system displays “Encode” interface, which is shown in Figure 5-5 and 5-6. Figure 5-5 Figure 5-6 Step 2 It is to set interface parameter, please refer to sheet 5-4 for more details about encode parameter description.
Dahua Video Conference Terminal User’s Manual Parameter Note Stream type It can configure main stream. Users can select H.264, MJPEG and H.265 encoding. Encode mode Resolution Frame rate (FPS) H.264:Main Profile encoding mode MJPEG:It needs higher stream value to guarantee image definition in this encoding mode. It is recommended to use the max stream value of the corresponding reference stream value in order to make the video image reach better result. H.265:Main Profile encoding mode.
Dahua Video Conference Terminal User’s Manual Figure 5-7 Step 2 It is to set device ID, SIP server, SIP service port, user ID, user password and etc. Note: Make sure the parameter on this interface has to be in accordance with the practical config of the MCU server; otherwise, the system registration fails. Step 3 Select “OK” to complete meeting setting. Note: Please check if system registration is successfully connected after completing all the configurations.
Dahua Video Conference Terminal User’s Manual 6 System Operation 6.1 Local Preview 6.1.1 Adjust Local Preview Image It is used to adjust local camera image before the meeting. Step 1 Select “Local Preview Image”. Step 2 Press button to confirm. The system displays “Local Preview” image, which is shown in Figure 6-1. Figure 6-1 Step 3 Press button to adjust camera angle. Step 4 Press button to realize image zoom in/out setting. 6.1.
Dahua Video Conference Terminal User’s Manual Figure 6-2 Step 2 Press “Number button” and input value with range 1~64. Note: Save the camera preset, you can press “Number button” to input corresponding preset value and quickly adjust camera lens. Step 3 Press button to return to main menu interface. 6.2 Contacts 6.2.1 Create New Contact Step 1 Select “Contacts > Contact person > New Contact”, it will display “New Contact” interface which is shown in Figure 6-3.
Dahua Video Conference Terminal User’s Manual Figure 6-3 Step 2 It is to set interface parameter, please refer to sheet 6-1 for more details about parameter. Name Parameter description Name It is to add member name. ID It is to add member device ID. IP It is to add member IP address. Email It is to add member email. Phone It is to add member phone number. The group to which the member belongs. Note: Group It needs to establish group first, otherwise, it fails to select in the box. Please refer to 6.2.
Dahua Video Conference Terminal User’s Manual Figure 6-4 Step 2 Check the members who need to be deleted. Note: Select “All” and it will check all the contacts. Step 3 Select “OK” to delete. 6.2.3 Create New Group Step 1 Select “Contacts > Group > New Group”. The system displays “New Group” interface, which is shown in Figure 6-5.
Dahua Video Conference Terminal User’s Manual Figure 6-5 Step 2 It is to set group name. Step 3 Select “OK” to complete adding group. 6.2.4 Delete Group Step 1 Select “Contacts > Group > Delete” and the system displays “Delete” interface, which is shown in Figure 6-6.
Dahua Video Conference Terminal User’s Manual Step 2 Check the group which needs to be deleted. Step 3 Select “OK” to delete. 6.3 Join Meeting It consists of “Join Meeting” and “Create Meeting”, which is shown in Figure 6-7. Figure 6-7 6.3.1 Create Meeting You can create immediate meeting and reserve meeting. Immediate meeting: It is to set meeting theme, duration, add members and etc, the meeting is enabled immediately. Reserve meeting: You can customize meeting time, and creating meeting.
Dahua Video Conference Terminal User’s Manual Figure 6-8 Step 2 As for meeting type, select “Immediate”. Step 3 Set “Meeting Theme”, “Duration” and other information. Step 4 Select “Add Members”. The system will display “Add Meeting Place/Contact Person” interface, which is shown in Figure 6-9.
Dahua Video Conference Terminal User’s Manual Parameter Contacts Groups Note It is to display the members added by contacts. It is to display groups. Note: In the form of group, add all the members of the group to join meeting. Sheet 6-2 Step 5 Check the needed meeting member to add. Step 6 Select “OK” to complete adding meeting member. The system displays “Create Meeting” interface, which is shown in Figure 6-10. Figure 6-10 Step 7 Select “OK” to finish creating meeting.
Dahua Video Conference Terminal User’s Manual Figure 6-11 6.3.2 Join Meeting Attention: When a user wants to join the on-going meeting, he or she has to be the member of it. Some meeting is in process, and you failed to join in time, then you can join directly via entering “Meeting ID”. Step 1 Select “Join meeting> Join”, and see Figure 6-12.
Dahua Video Conference Terminal User’s Manual Step 2 Enter “Meeting ID”. Step 3 Select “OK” to join meeting. Enter the meeting interface, which is shown in Figure 6-13. Figure 6-13 6.4 Control Meeting The meeting control is divided into “Host Meeting Place” and “Non-host Meeting Place’. Host meeting place: The host meeting place has the right to control the rights of all the meeting places, the meeting creator is the meeting host by default, which is shown in Figure 6-14.
Dahua Video Conference Terminal User’s Manual Figure 6-14 Figure 6-15 Note: Press button to display meeting menu interface. 6.4.1 Host Meeting Place 6.4.1.1 Split It will auto display the meeting picture according to the number of meeting places, it can also set meeting picture layout according to the user requirement, which is to satisfy multi-view watching.
Dahua Video Conference Terminal User’s Manual Select “Split > Select Meeting Place”, then the system displays the interface of “Select Meeting Place”, which is shown in Figure 6-16. Figure 6-16 Step 2 Check the meeting member whose meeting picture is needed to be displayed. Step 3 Select “Layout” and adjust the meeting picture layout of meeting member which has been checked. The system displays the interface of “Layout”, which is shown in Figure 6-17.
Dahua Video Conference Terminal User’s Manual Select “Distribution” and adjust the meeting picture location of the meeting members. The system displays the interface of “Distribution”, which is shown in Figure 6-18. Figure 6-18 Step 5 Select “OK” to complete setting. 6.4.1.2 Demo On Full HD data sharing is realized between external computer and meeting place. Note: It can connect computer to video conference terminal via VGA cable. Step 1 Select “Demo On” Step 2 Press button to confirm.
Dahua Video Conference Terminal User’s Manual Figure 6-19 Step 3 Press the of remote control to send/close demo (optional). 6.4.1.3 Control It can control some meeting member or all meeting members, which is shown in Figure 6-20.
Dahua Video Conference Terminal User’s Manual SN 1 Parameter Note It is to display member device ID. Enable/disable the member Mic. Enable/disable the member speaker. Hang up the member during meeting. 2 Call all meeting members again. Hang up all meeting members. Enable/disable Mic of all meeting members. Disable the Mic of all meeting members. Enable the speaker of all meeting members. Disable the speaker of all meeting members. Sheet 6-3 Step 4 Press button to select the control button you need.
Dahua Video Conference Terminal User’s Manual Step 2 Press to confirm and exit host control right of the meeting place. 6.4.1.5 More The button includes several functions, such as add, remove, overtime, tour and etc, which is shown in Figure 6-22. Figure 6-22 6.4.1.5.1 Add Step 1 Select “More > Add” and the system will display the “Add” interface, which is shown in Figure 623 and Figure 6-24.
Dahua Video Conference Terminal User’s Manual Figure 6-23 Figure 6-24 Step 2 It is to configure interface parameter, please refer to sheet 6-4 for more details about the parameter description. Parameter Contacts Temporary Note Select to add the members in the contacts. Enter member “IP address” and “ID No.” to add. Sheet 6-4 Step 3 Select “OK’ to finish adding.
Dahua Video Conference Terminal User’s Manual 6.4.1.5.2 Remove Step 1 Select “More > Remove” and the system will display the interface of “Remove”, which is shown in Figure 6-25. Figure 6-25 Step 2 Check the meeting place you need to remove. Step 3 Select “OK” to confirm. 6.4.1.5.3 Overtime Step 1 Select “More > Overtime” and the system will display the interface of “Overtime”, which is shown in Figure 6-26.
Dahua Video Conference Terminal User’s Manual Figure 6-26 Step 2 Enter delay time. Note: The range of delay time is between 1 minute and 999 minutes. Step 3 Select “OK” to confirm. 6.4.1.5.4 Remote PTZ Step 1 Select “More > Remote PTZ” and the system will display the interface of “Remote PTZ Control”, which is shown in Figure 6-27 and Figure 6-28. Step 2 It can press to realize shortcut operation.
Dahua Video Conference Terminal User’s Manual Figure 6-27 Step 3 Select the member you need to control. Step 4 You can press to realize shortcut operation. Step 5 Press 28. button and confirm.
Dahua Video Conference Terminal User’s Manual Step 6 Press button to adjust the preview image of the member. Step 7 Adjustment completed, press button to confirm. 6.4.1.5.5 Tour The host tours to observe each meeting place. Step 1 Select “More > Tour”. Step 2 Press button to confirm. 6.4.1.5.6 Log It is to check relevant event information happened in each time point during the meeting. Step 1 Select “More > Log” Step 2 Press button to confirm.
Dahua Video Conference Terminal User’s Manual Figure 6-29 6.4.1.6 Hang up Step 1 Select “Hang up” to exit or end meeting. The interface is shown in Figure 6-30. Step 2 You can press button to realize shortcut operation.
Dahua Video Conference Terminal User’s Manual Parameter Away End Note Exit the meeting interface temporarily. Note: You can select in the “Meeting Agenda” to call and return to the meeting again. The whole meeting is over; the meeting members have to exit the meeting. Sheet 6-5 Step 3 Select “Away” / “End”. Step 4 Press button to confirm. 6.4.2 Non-host Meeting Place 6.4.2.1 Demo On Full HD data sharing can be realized between external computer and meeting place.
Dahua Video Conference Terminal User’s Manual Step 3 Press the button of the remote control to send /close demo (optional). 6.4.2.2 Apply The host meeting place has more control rights than the non-host meeting place. Meeting place without host: You can apply to be host directly if there is no host in the meeting place. Meeting place with host: If there is host in the meeting place, then it needs to be agreed by the current host when you apply for host. Step 1 Select “Apply”.
Dahua Video Conference Terminal User’s Manual Figure 6-32 6.4.2.4 Hang up Step 1 Select “Hang up” to exit meeting, which is shown in Figure 6-33. Step 2 Press to realize shortcut operation (optional).
Dahua Video Conference Terminal User’s Manual Step 3 Press button to confirm. 6.5 Agenda It is to display the ongoing meeting and all the reserved meetings. Step 1 Select “Agenda”. Step 2 Press button to confirm. The system displays the interface of “Agenda”, which is shown in Figure 6-34. Figure 6-34 6.6 History It is to check relevant information record of the history meetings. Step 1 Select “History”. The system displays the interface of “History”, which is shown in Figure 6-35.
Dahua Video Conference Terminal User’s Manual Figure 6-35 Step 2 Select . Step 3 Press to confirm to call the meeting again.
Dahua Video Conference Terminal User’s Manual 7 Appendix Ⅰ Technical Parameters Parameter Note Device Dimension 245mm×166mm×156mm Package size 425mm×305mm×220mm(reference size, ±5mm) Device net weight 2.
Dahua Video Conference Terminal User’s Manual Compliance Information FCC 15.105 For a Class B digital device or peripheral, the instructions furnished the user shall include the following or similar statement, placed in a prominent location in the text of the manual: NOTE: This equipment has been tested and found to comply with the limits for a Class B digital device, pursuant to part 15 of the FCC Rules.