
User's Manual


58
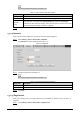
Record schedule Figure 4-44
Set a record plan. Step 2
Method one: Select a record type, such as Alarm, and then press and drag the left mouse
button to draw the time period for alarm record on the timeline.
Method two: Enter an actual time period.
Click Setting of the day you want to set. 1)
The Setting interface is displayed. See Figure 4-45.
Set schedule Figure 4-45
Enter start time and end time of the time period, and select record type from General 2)
and Alarm.
Select All or the check box of any other day, and the set time period will apply to
the selected days.
You can set 6 time periods per day.
Click Save to return to the Record interface. 3)
Each color matches with a different record schedule.