
User's Manual


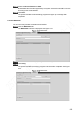


Table Of Contents
- Regulatory Information
- Cybersecurity Recommendations
- Foreword
- Important Safeguards and Warnings
- 1 Product Introduction
- 2 Dimension and Installation
- 3 Boot up the Device
- 4 Local Configurations
- 4.1 Initializing Device
- 4.2 Logging into the Device
- 4.3 Quick Configuration
- 4.4 Common Operations
- 4.5 Alarm Configuration
- 4.5.1 Alarm
- 4.5.2 Configuring Video Detection Settings
- 4.5.3 Configuring Alarm Events Settings
- 4.5.4 Abnormality
- 4.5.5 Configuring Alarm Output Settings
- 4.5.6 Searching Alarm Log
- 4.6 System config
- 4.7 System Update
- 4.8 System Maintenance
- 5 Web Operations
- 5.1 Initializing Device
- 5.2 Logging into the Device
- 5.3 Quick configuring
- 5.4 Common operations
- 5.5 System Settings
- 5.6 System Update
- 5.7 System Maintenance
- 6 Operating by DSS
- 7 FAQ
- Appendix 1 Mouse Operations
- Appendix 2 HDD Capacity Calculation
- Appendix 3 Technical parameters

150
Set up the start time of the queried file list, and then click . The queried recording
files are displayed.
Double-click the recorded video file to start playing back recorded video.
NOTE
Select the video files, and then click Download. The recorded files default
storage path is C:\RecordDownload. You can modify this path if needed.
Click More to search and download more recorded video files by file type or time.
You can also verify whether the watermark is falsified. See "5.4.2.4Downloading
Recorded Files" for specific steps.
5.4.2.3 Clipping Recorded Video
You can clip sections of recorded video and save to the PC.
Search the recorded video that you want to clip by using the calendar and time axle.
Select the channel number.
Clip the recorded video by either of the following ways.
Click , and the and sliders appear at the two ends of the time
axle. Move the sliders to the proper location, and then click to clip and save
the section between the sliders.
In the clip box, enter the start time and end time, and then click to clip and
save the section in this period.
Clip and save
The system displays the download progress bar. After downloading, the clipped video
files are saved in the Record Download folder. You can also change the save path if
needed.
NOTE
Click to stop the video download.
5.4.2.4 Downloading Recorded Files
Click More and you can search and download the recorded video files by file type or time, and
verify whether the file is falsified.
5.4.2.4.1 Download by file
You can download the recorded files by type.
Click the Download by File tab.
The Download by File interface is displayed. See Figure 5-38.