
User's Manual
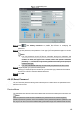


Table Of Contents
- Regulatory Information
- Cybersecurity Recommendations
- Foreword
- Important Safeguards and Warnings
- 1 Product Introduction
- 2 Dimension and Installation
- 3 Boot up the Device
- 4 Local Configurations
- 4.1 Initializing Device
- 4.2 Logging into the Device
- 4.3 Quick Configuration
- 4.4 Common Operations
- 4.5 Alarm Configuration
- 4.5.1 Alarm
- 4.5.2 Configuring Video Detection Settings
- 4.5.3 Configuring Alarm Events Settings
- 4.5.4 Abnormality
- 4.5.5 Configuring Alarm Output Settings
- 4.5.6 Searching Alarm Log
- 4.6 System config
- 4.7 System Update
- 4.8 System Maintenance
- 5 Web Operations
- 5.1 Initializing Device
- 5.2 Logging into the Device
- 5.3 Quick configuring
- 5.4 Common operations
- 5.5 System Settings
- 5.6 System Update
- 5.7 System Maintenance
- 6 Operating by DSS
- 7 FAQ
- Appendix 1 Mouse Operations
- Appendix 2 HDD Capacity Calculation
- Appendix 3 Technical parameters

112
If the reserved phone number was set, the interface is displayed.
If no reserved phone number was set, set the reserved phone number according
to system instructions. Then click Next.
Reset the login password.
Reset by QR code
In the Reset Type list, select QR Code, and then follow the onscreen instructions
to get the security code in your reserved email address.
CAUTION
Scan the QR code on the actual interface of Device.
You can get the security code twice by scanning the same QR code. If you
need to get the security code once again, please refresh the interface.
The security code is valid for 24 hours.
Security Questions
In the Reset Type list, select Security Question, the security question interface is
displayed. In the Answer boxes, enter the correct answers.
The password can only be reset through the security question after the security
question has been set.
Click Next.
The Reset the password interface is displayed.
Reset and confirm the password.
The new password can be set from 8 characters through 32 characters and contains
at least two types from number, letter and special characters (excluding ', ", ;, :, &).
Enter a strong password according to the security level indication.
Click OK.
4.8.3 Querying log
You can search, view, and back up the system logs to an external storage device.
Preconditions
Make sure the external storage device such as USB flash disk is connected to the Device.
Steps
Select STATUS > LOG.
The LOG interface is displayed.
Set up Start Time, End Time, and Types.
Click Search.
The searched logs are displayed. See Figure 4-98.
NOTE
After the external storage device is connected to the device, click Backup and
select the save path to back up the log to the external storage device.
Select log records and click Details to view log details.