
Quick Start Guide
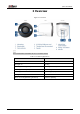
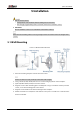
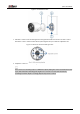
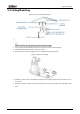
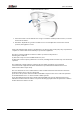
Table Of Contents

Quick Start Guide
8
5.2 Ceiling Mounting
Figure 5-4 Ceiling mounting diagram
1. P
lace the mounting template onto the desired location.
Ensure an outlet is nearby, and keep in mind the cable lengths.
2. Using a 15/64" (6 mm) drill bit, drill 4 holes over the X symbols on the template.
3. (Optional) Drill 15/64” (6 mm) holes for the anchors.
4. Remove the 4 pre-inserted plugs from the ceiling/table mounting bracket.
Figure 5-5 Remove the plugs
5. A
ttach the camera to the ceiling/table mounting bracket using the threaded insert at the rear of
the camera.
6. Rotate the camera clockwise until attached, then use the wrench to tighten the adjustable nut in
place.