
Quick Start Guide
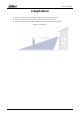
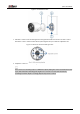
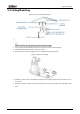
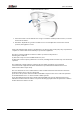
Table Of Contents

Quick Start Guide
6
5 Installation
●
Risk of electrical shock.
◇
Always follow code standards when installing wired connection.
◇
We strongly suggest that you hire a licensed electrician to install the camera.
●
Risk of fire.
Do not install the camera near combustible or flammable surfaces.
Make sure the mounting surface is strong enough to hold at least three times the weight of the
camera.
5.1 Wall Mounting
Figure 5-1 Wall mounting diagram
1. Place the mounting template onto the desired location.
Ensure an outlet is nearby, and keep in mind the cable lengths.
2. Using a 15/64" (6 mm) drill bit, drill 2 holes over the triangle symbols on the template.
3. (Optional) Drill 15/64” (6 mm) holes for the anchors.
4. Align the arrows of the mounting plate and template. Using a screwdriver and the provided
screws, secure the mounting plate to the surface.
5. Align the arrows between the wall mounting bracket and plate.
6. Push the bracket in to install, then slide down to lock in place. You will hear a‘click’ when the
bracket is installed.