Distributed Play Box User's Manual V1.0.
Foreword General This manual introduces the installation, functions and operations of the distributed play box (hereinafter referred to as "the box"). Read carefully before using the box, and keep the manual safe for future reference. Safety Instructions The following signal words might appear in the manual. Signal Words Meaning Indicates a high potential hazard which, if not avoided, will result in death or serious injury.
might result in some differences appearing between the actual product and the manual. Please contact customer service for the latest program and supplementary documentation. ● There might be errors in the print or deviations in the description of the functions, operations ● ● ● ● and technical data. If there is any doubt or dispute, we reserve the right of final explanation. Upgrade the reader software or try other mainstream reader software if the manual (in PDF format) cannot be opened.
Important Safeguards and Warnings This section introduces content covering the proper handling of the box, hazard prevention, and prevention of property damage. Read carefully before using the box, and comply with the guidelines when using it. Installation Requirements ● Improper use of the battery might result in a fire or explosion. ● Make sure to use the same model when replacing the battery. ● Use the standard power adapter.
Table of Contents Foreword .........................................................................................................................................................................................................I Important Safeguards and Warnings ............................................................................................................................................. III 1 Introduction........................................................................................
4.8.2 File Manager .................................................................................................................................................................... 24 5 System Settings ...................................................................................................................................................................................25 5.1 Setting the Date and Time ...............................................................................................
1 Introduction The play box is a new generation of smart cloud information terminal integrated with multimedia information release, advertisement release, audio power amplifier, and network access. Based on an industrial design scheme, it is paired with the information release management platform that features B/S architecture. The box can play images, videos, and scroll captions in both full screen or split screen.
2 Packing List Check whether there is any obvious damage to the package box. Unpack the box and check whether the components are complete according to the packing list.
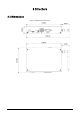
3 Structure 3.
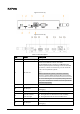
3.2 Ports Figure 3-2 Ports (1) Figure 3-3 Ports (2) Table 3-1 Port description No. Name Description 1 Power indicator light The light turns on when the box is powered on. Insert a TF card into the slot to store data. The maximum storage capacity is 128 GB. When the Android system repeats restarting because of abnormal operations, or the box cannot start, you can use the TF card to force update the system. 2 TF card slot 3 IREX port Connects to the infrared extension cable.
No. Name Description 9 Power port Connects to 12 VDC power adapter. 10 Audio jack Connects to a 3.5 mm headphone to output audio signals. 11 HDMI port Outputs signals to devices that support HDMI to play projects. 12 USB 2.0/OTG Connects to the mouse, USB storage devices and other types of devices. You can switch the USB mode to OTG. 13 USB 2.0 Connects to mouse, USB storage devices and other devices. 14 Network port Connects to the network cable.
4 Basic Operations Connect a mouse or use a remote control to operate the box. This chapter uses connecting a mouse for device operations as the example. 4.1 Starting and Shutting Down ● Before you start the box, check whether the input voltage matches the rated voltage of the box. ● To ensure stable operation and long service life of the box and external devices connected to the box, follow national standards and provide a power supply with stable voltage and low ripple interference.
Step 5 Set your security questions. Click Skip if you do not want to configure the security questions. 1. Select the security questions and then configure the corresponding answers. 2. Click Save and Next. Figure 4-2 Password protection Step 6 Step 7 Set the device name. 1. Click to set the device name. 2. Click Save and Next. Configure network settings. Click Skip if you do not want to configure the network settings. 1. Select a network type and then configure network settings.
Step 8 Register the box to the platform. Click Skip to skip platform registration. 1. Enter the IP address or domain name, port of the platform (MPS or ICC), and the department ID. Figure 4-3 Platform registration 2. Click Complete. 4.3 Login You need to log in to the system to perform operations when any of the following situations occurs. ● It is your first-time use after initialization. ● You locked the screen manually. ● The screen locked the screen automatically after a long period of inactivity.
Figure 4-4 Verify security questions 4.5 Changing the Password and Security Questions We recommend changing the login password and security questions regularly to keep the box safe. 4.5.1 Setting the Password Validity Period Step 1 On the home page, select Settings > Password Setting > Password Validity Period Setting. Figure 4-5 Password validity period setting Step 2 Step 3 Step 4 Select a password validity period. Permanent is selected by default. Click Confirm.
4.5.2 Changing the Password Step 1 Step 2 On the home page, select Settings > Password Setting > Password Setting. Enter old password and new password, and then confirm your new password. Step 3 Click Save. Figure 4-6 Password settings 4.5.3 Changing Security Questions Step 1 On the home page, select Settings > Password Setting > Modify Security Question. Figure 4-7 Modify security question Step 2 Change answers to the security questions.
Figure 4-8 Quick toolbar Table 4-2 Description of quick toolbar Icon Description Indicates whether the box is registered to the platform. Go to the home page. Adjust volume. Adjust backlight brightness. Lock the screen. Disconnect your USB drive from the box. 4.7 Releasing Projects You can release projects locally or through the platform. 4.7.1 Network Release Release projects through the network. Register the box to the platform when you use network release for the first time. 4.7.1.
Operation Description Release project through the platform After you add media and configure project plans on the platform, you can play projects on the box. For details, see the user’s manual of the platform. 4.7.1.2 Configuring the Network 4.7.1.2.1 Connecting the Box to the Network Connect your box to the network by Ethernet or WLAN. Also, once connected, it can be used as a hotspot for other devices. Step 1 On the home page, select Settings > Network Setting.
4.7.1.2.2 Configuring the Allowlist Configure IP addresses that are allowed to access the box. Only IP addresses on the allowlist can be used to log in to the web interface. This is to enhance data security. Step 1 On the home page, select Settings > Network Setting > Allowlist. Step 2 Click to enable the allowlist. Step 3 Add the IP address of the target device to the allowlist. 1) Click . Figure 4-11 Add allowlist 2) Enter an IP address. 3) Click Confirm.
Figure 4-12 Network release Step 2 Click on the lower-left corner. Figure 4-13 Platform address Step 3 Step 4 Enter the IP address or domain name of the platform (MPS or ICC), the platform port and the ID of the department that the box is in. After registration, you can only link the box with devices in the same department. For details on performing operations on the platform, see the corresponding user's manual. Click OK.
4.7.2.1 Configuration Flow of Local Release For General template, you can select Quick Play and Customized Play. For Special templates, you can select from Catering & Life, Special Offer & Promotion, Brand Publicity, Supermarket & Hotel, Info & News, Face Attendance, Stream Media, and Video Surveillance. Figure 4-14 Local release (general template) Figure 4-15 Local release (special template) 4.7.2.2 Releasing Projects by General Templates 4.7.2.2.
Figure 4-16 Quick play Step 4 Select a template. The system will display the media in the USBPLAY folder. A picture is displayed for 10 seconds by default and a video to its end. PDF files can be imported only to Template 1. 4.7.2.2.2 Custom Play Define your own templates to release information. Step 1 On the home page, select Local Release > General > Customized Play. Figure 4-17 Customized play Step 2 Click a template and then define the template.
Figure 4-18 Add media 2) Click , select media content, and then configure the picture play duration. ● Pictures are displayed for 10 seconds by default and videos to their end. ● You can upload multiple media contents and then drag the media to sort them. ● Click Step 3 Step 4 to delete the media. 3) Click OK. Click Preview on the upper-right corner to preview the project to be played. Click Publish on the upper-right corner to play your project immediately. 4.7.2.
Figure 4-19 Configure face attendance template Step 3 Click Edit on the upper-right corner. Figure 4-20 Setting 1) Click Add Channel.
2) Configure the parameters. Table 4-5 Description of adding channel Parameter Description Select a protocol depending on the device or platform that is connected. ● When the box is connected to IVSS (intelligent video surveillance Protocol server) or IP camera, select Acquisition. ● When the box is connected to SmartPSS, select PSS. ● When the box is connected to DSS, select DSS. Enter the IP address of the IP camera, IVSS, DSS, or PSS, depending on the Protocol that you select.
Parameter Description Enable or disable voice broadcast and temperature information and display face comparison results. ● Voice broadcast: Click to enable voice broadcast. The prompt that you customize manually does not support voice broadcast. Display Comparison Results ● Display successful comparison results: Click , and then select or customize the prompt to be displayed when face comparison is successful.
Figure 4-22 Add media 2) Click , select media content, and then configure the picture play duration. ● Pictures are displayed for 10 seconds by default and videos to their end. ● You can upload multiple media contents. After adding the media, you can drag the media to sort them. ● Click Step 4 Step 5 to delete the media. 3) Click OK. Click Preview on the upper-right corner to preview the project to be played. Click Publish on the upper-right corner to play your project immediately.
Figure 4-23 My project 4.7.2.5 Scheduled Project Configure which and when projects will be played. Procedure Step 1 On the home page, select Local Release > Scheduled Project. Step 2 Click , and then on the page displayed, click Add order play period. Figure 4-24 Add order play period Step 3 Set the time period, and then click . Figure 4-25 Add order play period Step 4 Click , select a project, and then click OK.
Figure 4-26 Add project Step 5 Click Save. The system goes back to the Add order play period page. Step 6 ● Repeat Step 2–Step 4 to add multiple order play periods. ● Up to 30 periods can be added. Click Save. Step 7 Click Publish. The box will play the projects according to the defined schedule. Related Operations ● Click to import project schedule. Create a folder named DAILYPLAN on the USB drive first, export the schedule from the platform to the folder, and then import the schedule to the box.
Figure 4-27 App center 4.8.1 Installing the App Install an app on the box, and then you can manage and operate the app. Prerequisites Insert the USB drive with the installation package (.apk) into the box. Procedure Step 1 Step 2 Step 3 Step 4 On the home page, select App Manager > App Center. Click Install App. Click the USB where the installation file is installed. Click the installation file. Step 5 Click OK. The installation starts. Follow the onscreen instructions to finish the installation.
5 System Settings 5.1 Setting the Date and Time You can set time and date for the box. Remember to select a correct time zone based on where the box lies. Step 1 On the home page, select Settings > Date & Time. Figure 5-1 Date & time Step 2 Step 3 Step 4 Set date, time, and time zone. You can also enable the 24-hour format. Enable IPC time setting, configure the Renewal cycle (24 hours by default), and then click Save.
Figure 5-2 Input source When the box itself acts as the signal input source that outputs signals through the HDMI port, Input Source Setting is not available. 5.3 Configuring Visual and Audio Parameters Adjust display effect of screen and device volume. If it prompts This operation may cause power increase. Do you want to continue?, click Confirm to continue. Step 1 On the home page, select Settings > Audiovisual Adjustment.
Table 5-1 Visual & audio adjustment Item Description Adjust the screen background brightness manually or automatically. Backlight Brightness ● Automatic background brightness adjustment is available on select models. ● Click to restore the default backlight brightness. Output Resolution The resolution is self-adaptive by default. You can change the output resolution. The box supports 4K resolution at different frequencies.
6 Maintenance and Update 6.1 Maintenance Requirements To keep the box running normally, you need to: ● Change the user password every three months. ● Restart the box regularly. ● Update firmware regularly. 6.2 Restoring Factory Defaults Restore the box to factory settings to handle problems such as storage insufficiency and system error. Please be advised that factory resetting might cause data loss. Step 1 On the home page, select Settings > Maintenance and Upgrade > Restore Factory Defaults.
Step 1 On the home page, select Settings > Maintenance and Upgrade > Auto Maintenance Time Setting. Figure 6-1 Configure auto maintenance time Step 2 Step 3 Step 4 Step 5 Drag your mouse up and down to select a time. (Optional) Select the days of the week to which you want to apply the automatic maintenance time. Click Confirm. Click any position out of the Auto Maintenance Time Setting page to finish configuration. 6.
6.7 Restarting the Box Manually restart your device to solve problems such as system crash. Step 1 On the home page, select Settings > Maintenance and Upgrade. Step 2 Click Restart Now. Step 3 Click Confirm. The box starts restarting. 6.8 Viewing Device Information On the home page, select Settings > Terminal Info, and then you can view device information such as device name, S/N, and app version.
Appendix 1 Cybersecurity Recommendations Mandatory actions to be taken for basic device network security: 1. Use Strong Passwords Please refer to the following suggestions to set passwords: ● The length should not be less than 8 characters. ● Include at least two types of characters; character types include upper and lower case letters, numbers and symbols. ● Do not contain the account name or the account name in reverse order. ● Do not use continuous characters, such as 123, abc, etc.
the risk of ARP spoofing. 8. Assign Accounts and Privileges Reasonably According to business and management requirements, reasonably add users and assign a minimum set of permissions to them. 9. Disable Unnecessary Services and Choose Secure Modes If not needed, it is recommended to turn off some services such as SNMP, SMTP, UPnP, etc., to reduce risks.
Legal and Regulatory I nformation 1 .2.51 .32. 1 52 1 0-001 V2.0.0 Legal Considerations Video s u rve, l lance can be repulated by l aws that vary from cou ntry to ccuntry Check the l aws ,n you r loca region before us,ng th,s prod u ct for s u rve, l lance p u rposes Disclaimer , Restrictions of Haza rdous Substances (Ro HS) Directi ve 2011 /65/EU and its amending Directive (EU) 201 5/863 A copy of the original declaration of oonfonnity may be obtained from Dah u a Technology.