
User's Manual


33
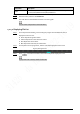
progress bar range.
Step 2 Hover over , and then Select start time is displayed.
Step 3 Click to set the start time for video clipping.
Step 4 Click the time axis to select the end time for video clipping.
The time must be within the progress bar range.
Step 5 Hover over , and then Select end time is displayed.
Step 6 Click to set the end time for video clipping.
Step 7 Click , and the clipped video will be saved in the path set in "5.1.2.5 Path".
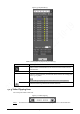
4.1.6 Progress Bar Time Formats
This section introduces the time format of progress bar.
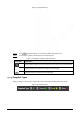
Figure 4-11 Progress bar time formats
Table 4-7 Description of progress bar time format
Parameter
Description
Click the button, and then the progress bar displays the recordings in 24-
hour mode.
Click the button, and then the video within the selected 2-hour period is
displayed.
Click the button, and then the video within the selected 1-hour period is
displayed.
Click the button, and then the video within the selected 30-minute period is
displayed.
4.2 Image Playback
This section introduces the operations of image playback.
Select jpg from the File Type list.