
User's Manual


152
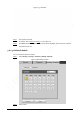
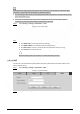
Figure 5-135 Record schedule setting
Step 3 Click Save to return to the Record page.
At this time, the colored chart visually displays the defined period.
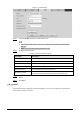
● : Represents general recording.
● : Represents motion detection recording.
● : Represents alarm recording.
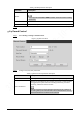
Figure 5-136 Recording schedule setting completed
Step 4 On the Record page, click Save, and the Save Succeeded! prompt will be displayed, which
means the recording schedule has been set.
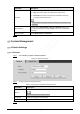
5.6.1.2 Snapshot
Step 1 Select Setting > Storage > Schedule > Snapshot.